Overblog
Suivre ce blog Administration + Créer mon blog

upcycling

Sewing a Skirt from a Vintage Burda

Publié le par Charly C.

Hello, all!

I don't know how many of you remember that last year I did something called Blog-March. There aren't many entries to check out, sadly. This year, I decided not to participate anymore.  

In this entry, i mentioned i made a green skirt, perfect for Saint Patrick's day, celebrated on March 17th. I believe I also mentioned i might share how I made it and so on. Well, today is the day this will happen. And as it happens, it is now May that i finally manage to gather my thoughts related to this entry and complete it.

green skirt slow fashion sewing diy clothes Burda Moden
Please ignore the wrinkles..

SKIRT DESIGN

I found the skirt in a vintage Burda magazine, from May 1996! I posted a quite short browse-through of this issue, in this entry, if you're curious. 

Below, you'll see what the skirt is supposed to look like, according to the magazine. The skirt has 2 front panels, 2 back panels, pockets, a waist band, as well as panels for the buttons and button holes. 

Skirt 107 from Burda Moden 5/1996
Skirt 107 from Burda Moden 5/1996Skirt 107 from Burda Moden 5/1996

Skirt 107 from Burda Moden 5/1996

As you can see, Burda is rating the difficulty of the designs it shares. I think the rating is from 1 to 4 or 5 dots. This skirt has a rating of 2 dots, making it relatively easy to make. For those confused, in the picture with the model sitting, 106 represents a body. The skirt has the number 107. 

The difficult part is the pockets. I believe there's a sewing lesson with how these pockets must be done. Let's just say i simplified my life by not using any pockets initially. I only added them last month, but i'll talk about that later. 

The sizes of the skirt are European 36 through 44, where 36 is a Small and 44 is a Medium? In Burda, 44 is the smallest size for the garments dedicated to "Plus Sizes." According to the measurements in Burda, i'm size 44 and so this is the one i traced and made. 

It seems i have no picture taken of the traced pattern, just this copy i made in order to make a patchwork skirt. This is what i'm currently working on. One of the projects. 

The skirt is supposed to be 80 cm long. I don't know why i remember adding a few more centimeters to this, but i'm not sure i did. 

Sewing skirt with vintage Burda 5/1996 pattern

FABRIC

As far as fabric goes, i had this green fabric i found at the dumpster. It was a neighbor who got rid of several lengths of various types of fabrics. The colors and overall design also differed. 

In the next pictures, i'll share, you'll see the color changing. This is because i was working in the evening, and my light was crap.

I believe the weave is a damask. I'm not sure what the fiber is. The burn test indicates cotton or similar, as it smells like burned paper. It is relatively heavy, so it hangs nicely. 

However, i didn't have quite enough fabric to make the skirt as it was indicated, or perhaps I wanted to make things a bit easier on me. I forgot. This means i cut the back part on the fold, giving me one less seam to sew. 

Cutting the panels and sewing them together was very easy, and nothing to write home about. The next step i took was to attach the panels for the buttons and their respective holes.

This was also pretty easy: I sewed pretty sides together, then i sewed by hand on the back (i think). This way, the raw edges were enclosed in the button bands. The next step i took, was to install the waistband. I redid the process, though i do regret not reinforcing in any way the waistband. 

Then i had to hem the skirt. i made some sort of maybe bias? tape out of an underskirt i somehow i also found at the dumpster. The original item had nearly the same shade of green as the skirt, as you can see in the next picture. 

Buttons and Closure

The skirt is supposed to have real buttons down the front, however due to my fancy-looking fabric, i didn't think this would be the best choice especially since the buttonholes had to be done in the fabric. My next option was to install a zipper, but i'm not that good in this department and i wasn't thrilled by this idea either. 

green skirt slow fashion golden buttons sewing with burda
testing out some golden buttons. i liked the look, but i didn't lik the buttons up-close

A brilliant idea came to me when i realized i can use snap buttons hidden by fabric-covered but fake buttons. I had some on an old silk jacket, so i undid one of those to see how they're made. I noticed that it had 2 layers of material, one the size of the button and the other one, larger. I then copied the fabric outline onto paper, to make patterns.

golden buttons damask silk close up
Closeup of the buttons i was considering and the one i copied

Once i had the patterns, i cut out the fabric, and i started covering my buttons. I luckily had some old, ugly, blue buttons that have the same size as the original.

The first step was to stitch a simple row around the edge of the fabric, put the smaller piece on top, then the button, and then pull the thread to close the fabric like a really small sack. The last steps would be to secure the fabric around the button with a few extra stitches and then to attach the new button to the skirt. 

Refer to the next pictures for a better mental image regarding this process, along with a comparison to the original button. 

Sewing a Skirt from a Vintage Burda

It would probably have been easier if, for the smaller pieces, i would have drawn circles directly with the button, but the idea just occured to me now (more than a year after i completed the process). 

For the snap closure, i had to go to the haberdashery to buy the snaps. Luckily, i found and they were affordable. They’re the same diameter as the buttons. I sewed the snaps first, then the fake buttons on top and I really like the result! The swish! factor is 'chef’s kiss' 😗

sewing Burda may 1996 green skirt handmade

In this picture above you can see the hem of the skirt on the inside. That green band used to be some petticoat maybe? but it couldn't be used anymore - i forgot why. So i cut strips of some 7 cm? (3 inches? about?) and i sewed them together, to form a VERY long ribbon.

I know for sure i didn't cut the fabric on the bias but on the grain line. Then, the very long ribbon i sewed by machine to the very (not even) edge of the skirt, and then i sewed it by hand to hide ALL raw fabric edges. The best part about doing this is that i was able to more or less even out the skirt's hem and the result is rather professional looking - if you ask me.   

This year (2022) I decided I wanted pockets in this skirt even if the fabric is fancy-looking. Look, pockets are useful even in a fancy-looking garment, ok? for this, I had to take the easiest route, and that was to open the seams of the skirt. Look it up all you want: seam pockets are the easiest to make, even in already bought garments. 

However, this is will require an entry of its own. This one already became too long. What i want to say is that i really like the result and i think it looks BETTER than in the Burda sewing magazine. 

©Charly Cross 2013 - present. All rights reserved.

Do you want to buy me a coffee? this is a 1-time donation, thank you very much!

Voir les commentaires

Expectation VS Reality - DIY edition

Publié le par Charly C.

Hello there!

Did you expect to see me? neither did I. 

Do you know how people order things online hoping they'll receive something cool, something they think will look good, will make them feel better, and so on and so forth? 

I have done that. But i didn't expect things to be THAT amazing, to begin with. You can read more about that experience in this entry

So this entry is not about my expectations being ruined by a bad online shopping spree. Instead, I want to talk about a DIY project a did over the past 2 or 3 weeks. Well, i finished it last week.

I didn't plan on writing about it. However I shared it to this FB group and 87 people liked it and congratulated me for the result. 

The story goes something like this: 

When the stores finally opened back at the beginning of summer, fiance bought a small white Guess bag from an outlet. 

It was in a decent shape, with the only flaws being the several visible stains. On both sides. Unfortunately i don't have a picture of the bag :( 

I thought we can clean it. [FIRST EXPECTATION!]

[FIRST REALITY] hit when after several attempts, and several products, we realized that taking those stains out won't work. 

The DIY project begins!

THE SOLUTION TO THE PROBLEM

The solution we came up with, was to paint the bag. At least on the front.

This was a pretty easy idea to put into practice. All i needed was:

  • acrylic paints - done!
  • paintbrushes - done!
  • inspiration 

The inspiration came from a google image search. I searched for "an easy acrylic painting" or something along that line.

And I found this picture: [EXPECTATION 2]

I thought it's a decently easy image to reproduce. So i started working. 

First, i used a pencil to draw the circle in the middle, and 2 vertical lines in the middle to "split" the background into the night/day halves. I also drew the curved line for the crescent moon and the "flames" around the sun. 

This part was THE easiest to complete. 

I then started painting and i used the lightest colors first. 

I don't have much to say about the painting process. I tried to make sure i don't leave white spots as the surface of the bag is textured, not smooth, as you'll see from the pics below. 

So, this is what I got. [REALITY 2] it's not AS pretty as the inspiration photo, but it's alright. I think. 

And when you open it, you get almost the same image. I didn't want the image to be split or incomplete when open. I also have the impression it looks more "intended this way by the designer" and not "oh, I painted this and did the shittiest job."

It had 2 loops for a shoulder chain. My fiance said they'll use it more like a wallet than a purse, therefore, I thought that keeping the chain would be in the way, in a bag. 

I hope this entry inspires you to find a solution when your favorite bag gets dirty and you can't clean it, and you also don't want to get rid of it. 

I didn't use a sealant, but I should, and I'll be looking for some sort of sealant. The light blue side is a bit sticky to the touch even though so much time passed since I finished this project. So, if you do this, make sure to use a sealant. 

See you in the next one!

© Charly Cross 2013 - present. All rights reserved.

Voir les commentaires

Changing a jacket' sleeves

Publié le par Charly C.

Hello all! 

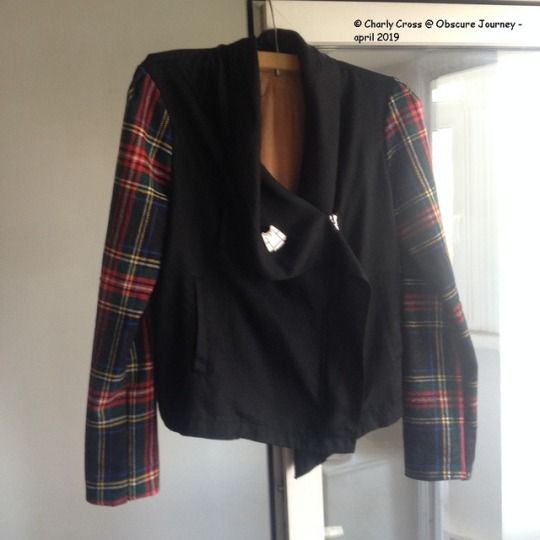
I had a thin Zara jacket with faux leather sleeves. I bought it several years back during the summer sales, if I'm not mistaken. But as it goes, faux leather started peeling and I don't like that. I don't know who likes peeling leatherette, to be honest.  So, I thought to myself that I won't be wearing the jacket anymore though I could try to change its sleeves now that I have some good fabric shears and a decent sewing machine. I also have a few books that teach how to make sleeves and attach them to the garment. The only downside was that I would be ruining the pretty (and very cheap) fabric A got me (from a second hand store. It was there because someone cut it twice on bias, and it probably wasn't enough for their project.) 

So, my thoughts were:

  • I wanted to make something with the fabric
  • I HAD to use it (the fabric) in the end, somehow
  • the fabric was cheap - about $1 for a yard or so? I didn't measure it, sadly. 
  • I wasn't going to wear the jacket anymore
  • I would be learning something
  • I received encouragement to "just go for it!"

I don't think I needed more excuses. So I started with ripping the seams apart because I wanted to use the existing sleeve as pattern for the new sleeve. 

  • the sizing was the right one, especially the arm-hole
  • the length was ok - i could always cut a few extra cm if needed, which I did anyway.
  • I wasn't in the mood to learn how to make a sleeve pattern from scratch. That day will come, but it wasn't this day. 

Sadly, I don't have pictures for all the steps :( I thought of taking pictures when it was too late. Some steps don't even need pictures because anyone can do those with the right tool.

the process

I started by removing the sleeves from the body of the jacket using the seam ripper. My sleeves also had zippers, so I also removed those after. 

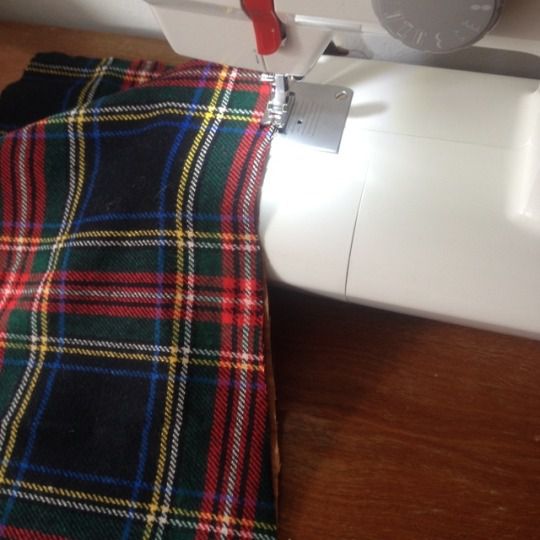
Once I had my sleeves, I took one and I placed it flat on some newspaper to make a sleeve pattern, so I can cut the new sleeve from some fabric. I placed the fabric folded over.  When I cut the fabric, I included more seam allowance vertically, but not for the width. 

I didn' like what the fabric felt against the skin, as I knew I would wear this jacket over a tshirt as well. This meant I had to find some fabric to make a lining. The fabric I found is brown and ugly, but serves the purpose just fine. 

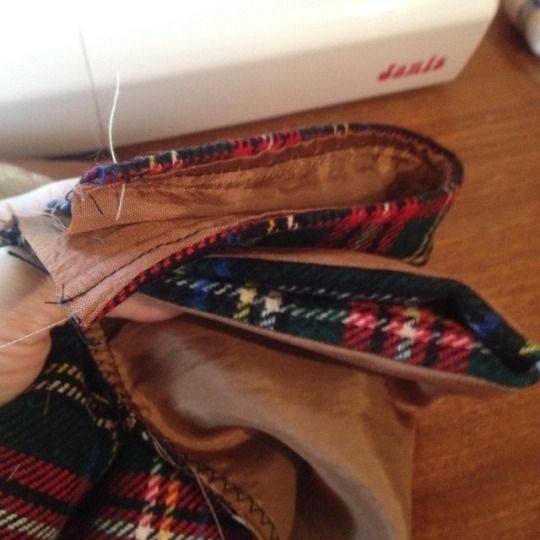
You can't really tell from the picture, but first I sew the sleeve to the lining (former sleep wear i believe) at the wrist-end. I then pinned down the sleeve to the rest of the fabric, and then I cut the lining. (note 1)

I also sew the lining to the tartan, before assembling the sleeve together. I figured that shiny and slippery fabric would be difficult to work with if it's not attached. I also ran a zig-zag stitch. (note 2)

Originally, the previous sleeves did have lining as well. I couldn't use it though. The seam allowance was fraying badly. Additionally it was shorter, because the leatherette was folded over some, like the sleeves on suits and coats. 

As I said, I wasn't going to learn how to make such sleeves. This means that the brown lining can be seen at the wrist level, on my sleeves. It also looked ugly. I decided to run a top stitch to see if it looks any better, and it did! See the picture below.

If you do a sleeve like I did here, I highly recommend you do the same. In my opinion, the piece looks 'done more professionally.' You can do this top stitch AFTER sewing the sleeve, so that  the seams would lay flat against your wrist, and rub less. If I ever do this again, I'll know what I need to improve :)

 After my sleeves were complete, it was time I attached them to the body of the jacket. The sleeves I made were a bit larger than the arm holes of the jacket. I started pinning the sleeves starting at the armpit seams going to the top. At the shoulder part, I needed to create 2 pleats. Gathering the fabric is an option, but not for this lined tartan. The pleats give the sleeves a more structured, put-together, "professionally done" look, in my opinion.

And this is the final result! What do you think? 

extra step

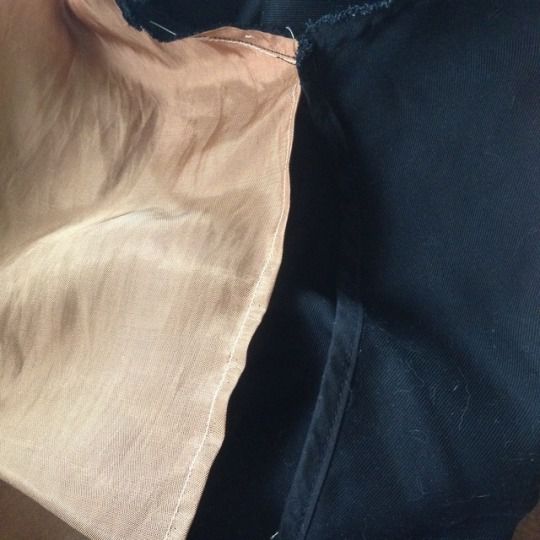
However, before attaching the sleeves, I decided I wanted some lining for the back part of the jacket as well. I used the same ugly brown one as for the sleeves. The jacket is very thin, and the spring was cold this year. I wanted some protection from the wind, and the lining would provide just that. 

I used the back of the jacket to serve as guide for a pattern, drew it on paper, cut the brown fabric, and sew it onto the seams of the jacket. I don't have more pictures, sorry. :( 

 That's about it! Don't skip reading the notes below to learn what I wish I did differently.

See you soon! 

Note 1: The funny thing is that while I tried to sew the right side of the tartan fabric to the lining, i only managed with one sleeve. The other one, the tartan is on the wrong-side. I obviously saw too late. I didn't and won't go back to fix it. 

Note 2: I wish I assembled the tartan first into a sleeve, then the lining, and then attach the tartan to the lining at the wrist. I thought of this too late. 

Note 3: This project is from April 2019. I didn't get to watermark the images. Now with my arm in a cast, doing so is more difficult. 

© Charly Cross 2013 - present. All rights reserved.

Voir les commentaires

Fighting Consumerism

Publié le par Charly Cross

We all know we live in a highly consumerist society, or era better said. This can easily be said about technology, clothes and even food. 

Technology these days is poorly made ON PURPOSE to be replaced often. Why do you think Apple releases a new iPhone every 6 months or so? their excuse is: "we added a little fix" or "we improved this little thing," and so on.

The same can be said about clothes - at least about what we call fast fashion. Except their excuse is "that you MUST keep up with the trends." There are of course several other aspects in our lives where we're told "this season you MUST buy this or that in order to impress" and the list goes on and on. 

You know what? you must not keep up with any trend! you must not impress anyone with newly bought stuff either! 

Fighting Consumerism

You know what? I've had it! a long time ago. And as a result I did all I could to stop buying new items. At least on full price. There are only a few exceptions, because I can't find everything discounted or as second hand. I also started sharing with A coats, shoes, scarves, tshirts - mostly because that's all we can share, since A is much tinier than me. 

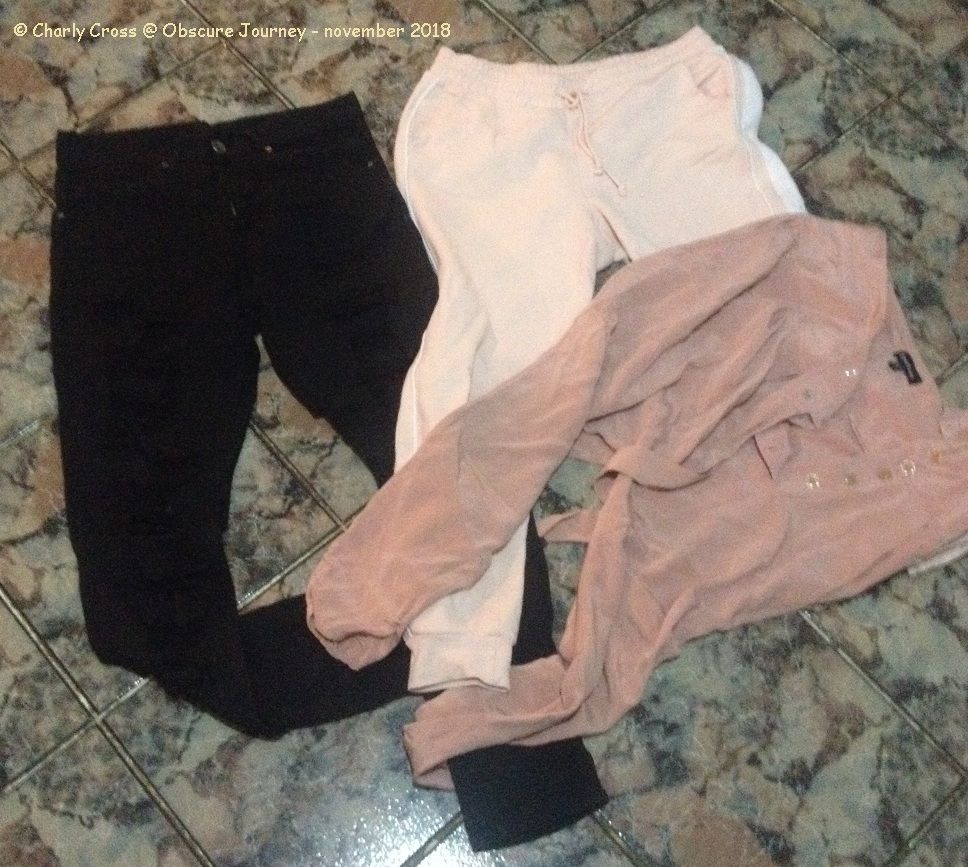
Below are some of the stuff A gave me - i chose to show you 3 pairs of pants. One of the pairs is pink and thick sweat pants, which is one of the most recent "gifts". The oldest is the pink silk pair with an over-sized upper part, while the black pair are some ripped jeans for which i must lose some weight. 

Fighting Consumerism

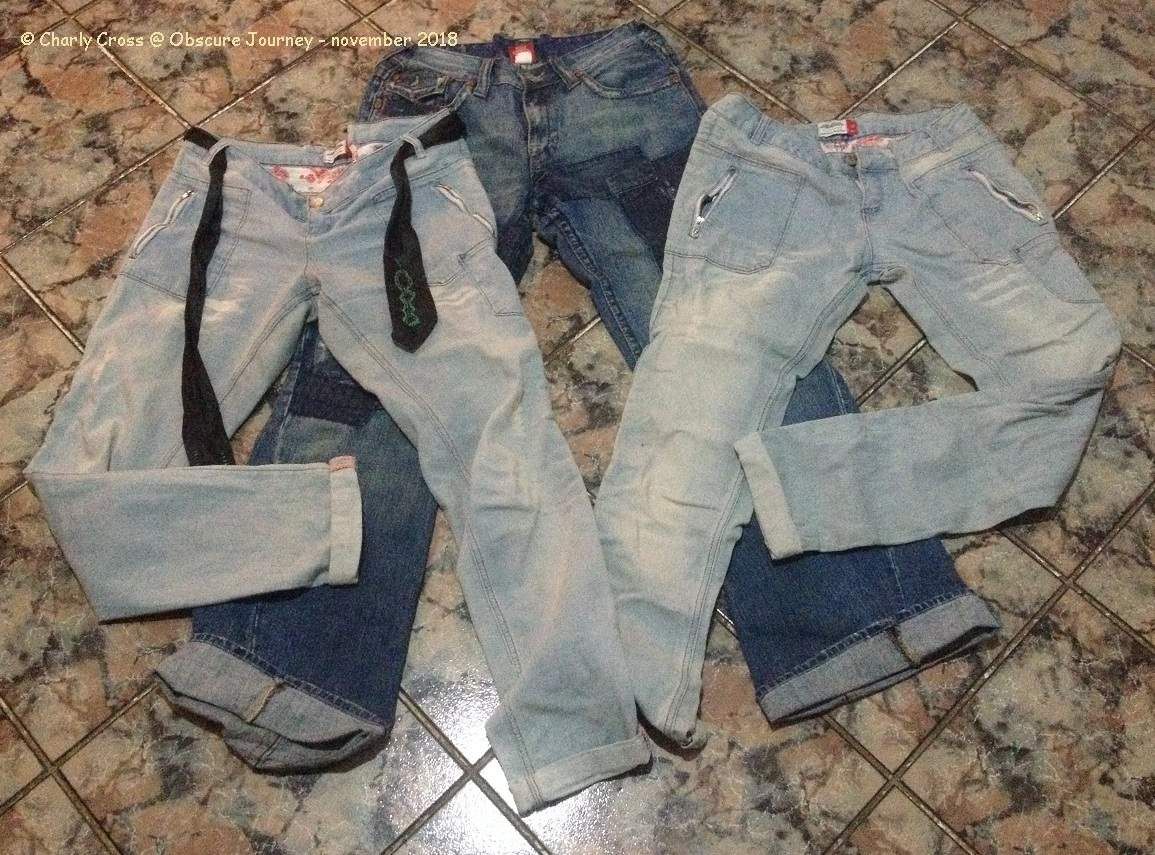
I started buying clothes only when there are sales, or from discounted boutiques - so basically the stuff other people didn't like anymore. Let me give you some examples below: 3 pairs of jeans from an discount outlet and 2 tshirts on clearance from a known store (fast fashion, which I'm not very proud of, but I figure that sometimes it's ok if there's an item that we really really like. it's more wasteful if the stuff gets destroyed, in my opinion, and a shame for the work of someone.) 

And yes, 2 of those pairs of jeans are identical, because they fit me so well, and they are so comfortable. The material and the seams seem of pretty good quality as well, and the price was unbeatable - 10 lei a pair! (about 2.5 USD?) The darker large pair is also made of a good quality fabric - thick and heavy, and not stretchy at all. I thought they're designer, but i think they're fakes. Meh! 

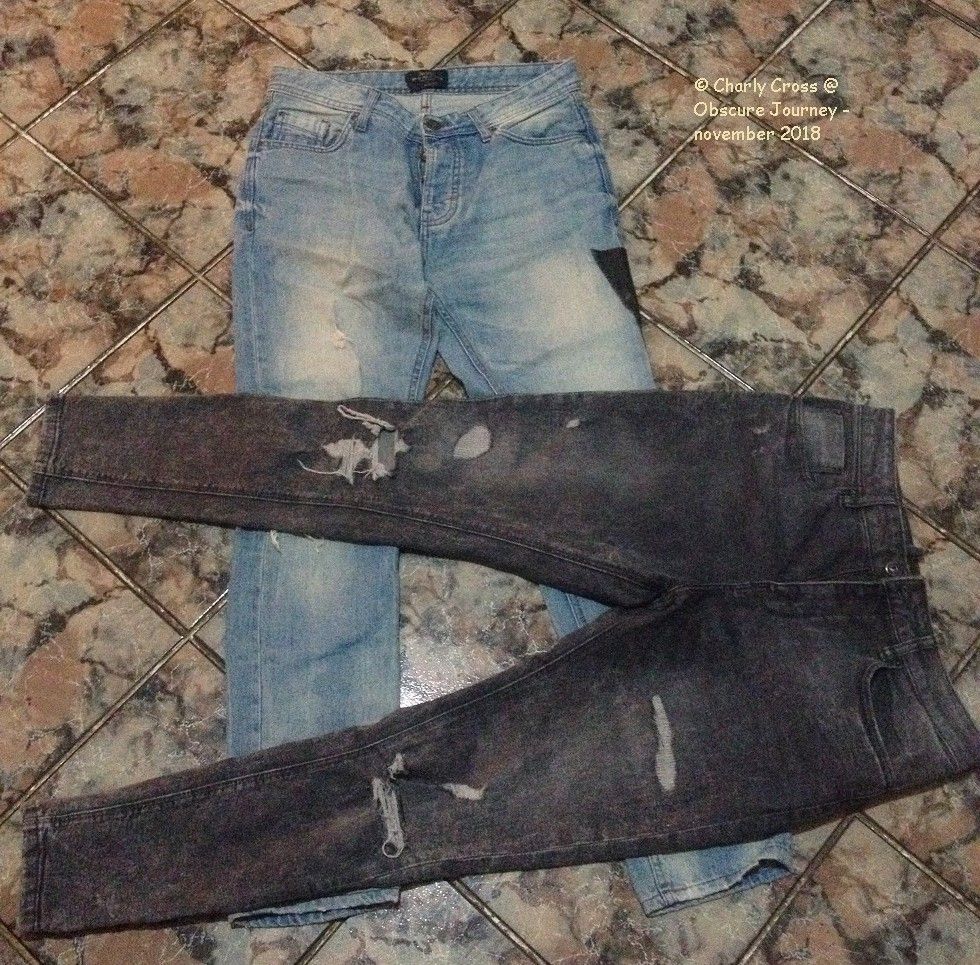
I also checked the clearance section of another fast fashion store, but the men's section. I found 2 pairs of jeans that i really like how they look and feel. See them below as well, in the 3rd picture.

Fighting Consumerism

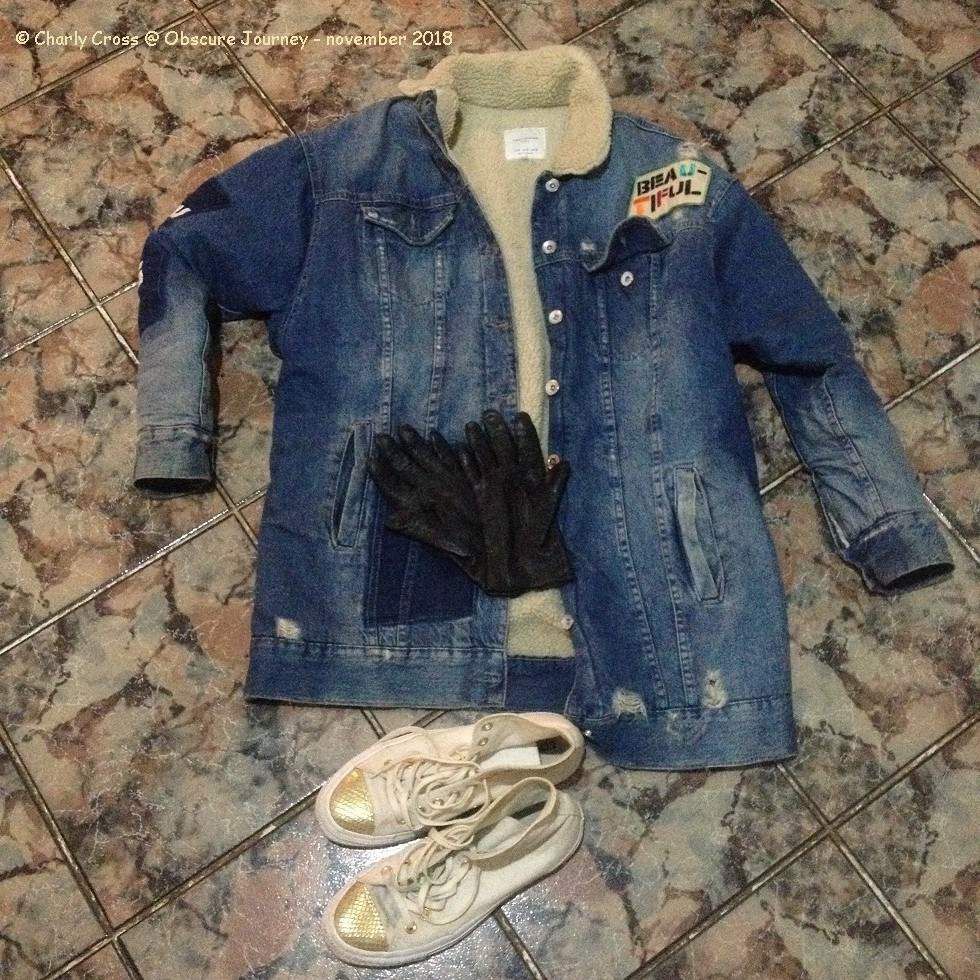
I also got some clothes and footwear for free, from a "swap shop" event I found on facebook. There's a jeans jacket, 2 pairs of boots, and some tshirts.  A got a few dresses as well, and a flannel shirt. I'll include a pic of a few of the items, not everything. 

One of the tshirts I got had a few holes in it, that I didn't see when i chose it. I didn't think much about them, and I decided to mend them somehow. 

Speaking of free stuff, remember my post about the expensive stuff I simply found? That's another way I fight consumerism. or by using facebook groups like freecycle, where people give away for free, the items they don't need or want anymore. 

Fighting ConsumerismFighting Consumerism

I mentioned earlier I mended some clothes. Luckily, these days fashion is very permissive and allows patches over patches as well as destroyed garments. 

On the tshirt with little holes, I used some clear nail polish to prevent the holes from getting bigger. Then i proceeded to sew on, by hand, some small patches or (printed) ribbon. The ribbon was used as a tag on some other item A got from another outlet (i think). 

Fighting ConsumerismFighting ConsumerismFighting Consumerism

Another way we saved some money and fought consumerism, was to share some of the clothes we own.  The easiest is to share the jackets and the shoes, like in the picture below. But granted, we can't share all the shoes nor all the jackets. 

The home clothes and socks are other items we share, just because it's more convenient this way. 

Fighting Consumerism

I want to hear from you, how do YOU fight against consumerism, and if you have any other tips for me. :)

© Charly Cross 2013 - present. All rights reserved.

Voir les commentaires

DIY: shirt into pillow case

Publié le par Charly C.

This week is for another do-it-yourself project presentation. YAY?

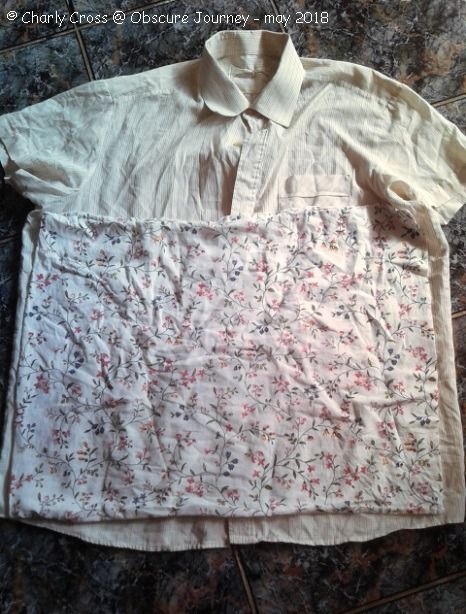
Let's learn how to make this pillow case from a shirt! shall we? In the first pic I used a different shirt because i didn't think of the pics I'd use, ahead of time. Plus I realized a bit too late I could make a blog entry about this process, so not all the pics are with the same shirt. I hope it doesn't bother you much. 

from the shirt on the left to the pillow case on the right. from the shirt on the left to the pillow case on the right. from the shirt on the left to the pillow case on the right.

from the shirt on the left to the pillow case on the right.

There's a little backstory for this DIY, so let's start with that. If you're not interested in it, scroll down till you see the first picture. ;)

We received some pre-owned/pre-worn shirts because "they're still in a good condition, maybe they fit you and you can wear them!" As great as this sounds for a minimalist person or someone who's concerned about too much waste and poverty, the reality is that those shirts were obviously worn. 

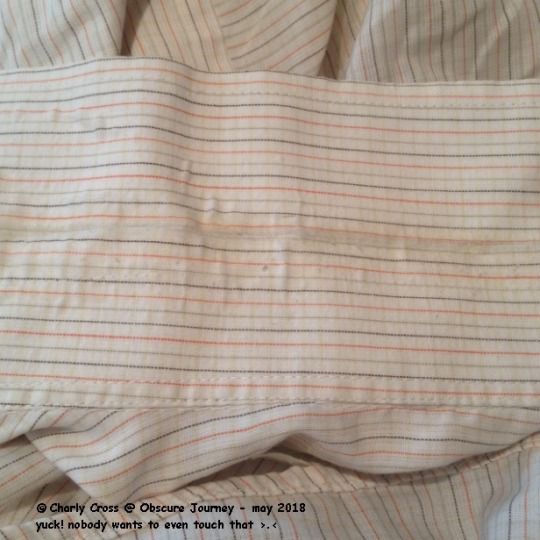
The shirts were in decent condition, but they're yellow on the collars, the fabric is also a bit destroyed because they've been worn too much. Even washed, these garments are nowhere near to be worn again, not even indoors. See first picture, here below.


ewww, to gross to still wear >_<

ewww, to gross to still wear >_<

I didn't throw them away because I thought I could do something out of them. I first thought of cleaning rags, but the fabric is not quite the right type, but more of a bed sheet type. And then it hit me that I needed more pillow cases - stitching together pieces of fabric to make a sheet is too much even for me. 

Things I used: 

  • an existing pillow case
  • scissors
  • sewing needle and thread
  • clothes iron
  • measuring tape (not really used in the end) 
  • pencil 
  • extra needles


very old scissors, sewing thread and measuring tape. pencil type is below.

very old scissors, sewing thread and measuring tape. pencil type is below.

The first step is to make sure the garment doesn't have holes and clear of wrinkles, hence the clothes iron. If it has holes, either patch them up or give up the garment. My shirts don't have holes, so I checked to see if they're big enough to make a case. They're mostly men's shirts, so there's enough fabric - see below. 

making sure the shirt is big enough for a pillow case

making sure the shirt is big enough for a pillow case

If you align the old pillow case to one of the side sewings of the shirt you'll save yourself some time as you'll only have 3 more sides to sew together.  Make sure to turn the shirt inside out to have it ironed (not even designers work with wrinkled fabric), and buttoned up.

In my opinion, the bottom hem is the easiest to start with, especially if it's a straight one. But you could align the shoulders in place, pin the case to the shirt and start sewing all around it. 

I sew by hand, and this means I needed more visual guidelines and this is where the pencil proved useful as I drew around my pillow case, on the shirt. Depending on the type of lead, it will be really easy to draw on fabric. My pencil is a Staedtler norica 132 46 HB 2 if it's of any help. 

Sewing all sides with the pillow case still attached to the shirt will save you some time. This is especially true if you have a sewing machine [unlike me]. Well, it will save some time when sewing by hand as well.

DIY: shirt into pillow caseDIY: shirt into pillow case

Now supposedly you sew all the sides of the pillow case. It's time you cut all the excess fabric. Once all the extra fabric is removed, you will have something that looks a lot like a pillow case. See below how mine turned out. I must say I'm pretty proud of myself. 

I purposely left the buttons of the shirt on to save me time and effort. This way I don't have to sew other buttons, nor a zipper. The pillow case looks a bit old fashioned, but I find it really pretty. 

This was my first time completing such a project, and sewing it by hand along with having other projects going on, made this DIY unnecessarily long. I think that with a sewing machine this would be a 30 minutes (tops) project. 

DIY: shirt into pillow caseDIY: shirt into pillow case

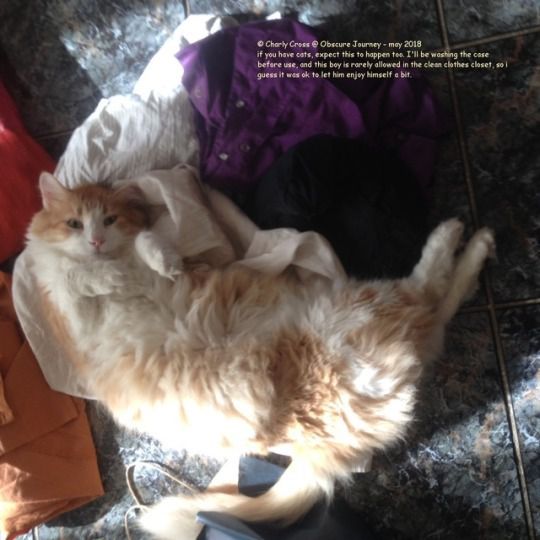
Of course, I leave the project for 5 minutes, and I return to see this (below). If you have kids, cats, dogs, any other pets, make sure they don't have access to the needles if you need a short break from your sewing or whatever you're doing. You may know this, but while it looks cute in photos and in real life, such a situation can be dangerous - luckily my boy wasn't sitting on the one I was working on. 

sometimes cats happen

sometimes cats happen

PS: Sometimes, after you finish your first project, you may realize that placing the pillow case in a different position on the shirt, it could make your job even more easy. In my case, I placed the existing pillowcase in "landscape" position while the shirt was in "portrait" mode. Like this, I only had to sew 2 sides only, saving me even more time. See the pic below for a better understanding.

The resulting is not much different than the first one I made, so I didn't think another image would be needed. 

DIY: shirt into pillow case

 © Charly Cross 2013 - present. All rights reserved.

Voir les commentaires