

/image%2F2671538%2F20210419%2Fob_819872_img-0313.JPG)
Hacking my pants with a DIY pocket
While I have many other things to update you guys on, on Friday that just passed I was hit with a wave on inspiration and I thought I could write about the result, and show you the process of getting a similar look, if you'd like to.
Let's start with 2 things:
- pockets are useful and sometimes fun
- I have at least one clothing item with no pockets
Clearly, something had to be done, especially now that winter is coming. So I decided to hack my clothes by adding pockets to them. I started with some training pants - is this what they're called? - though, this must be one of the more difficult clothing items to start practicing with.
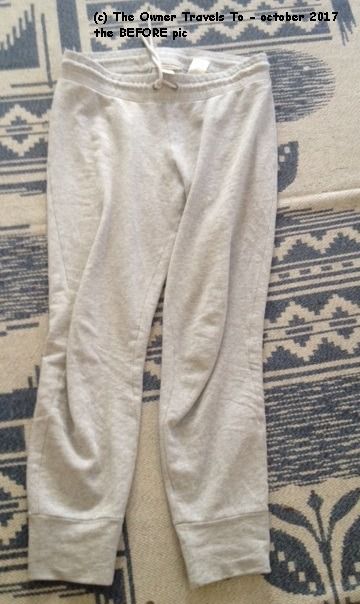
So these are my pants. Aren't they kinda plain and boring?
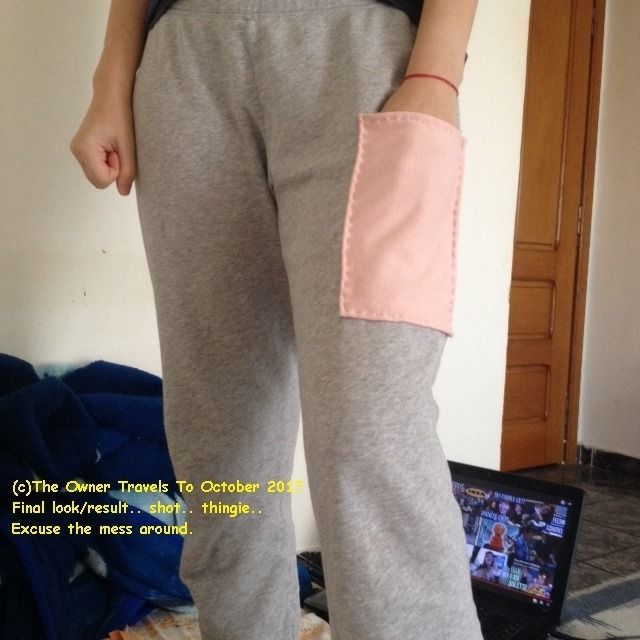
This is how they turned out!
Not too shabby, if I can say so myself. My partner thinks the result is rather cute and not all that bad for the first ever DIY / hack project. There are a few steps to follow if you want a similar ... look, or result ... however you want to call it.
TOOLS:
- clothes that need pockets
- fabric to turn into pockets
- scissors
- thread and needle
- pencil and eraser, maybe
- paper [for your pattern]
HOW'S DONE, step by step: guaranteed 100% NOT foolproof
- Choose a clothing item that could need some pockets - in my case, some HM sweat pants I got on sale, in summer or so.
- Search for fabric that would look nice on the chosen clothing item. I used some old sweat pants by Juicy Couture, on baby pink [is this how the color is called?] Those pants were some 8 or 9 years old and were well loved and falling apart, but I still felt bad for just throwing them away and some parts were still in decent condition. hmmm
Make sure the fabric you find matches somewhat in thickness with the garment, and is made the same: woven or knitted. It will look better, than mixing thickness and fabric type.
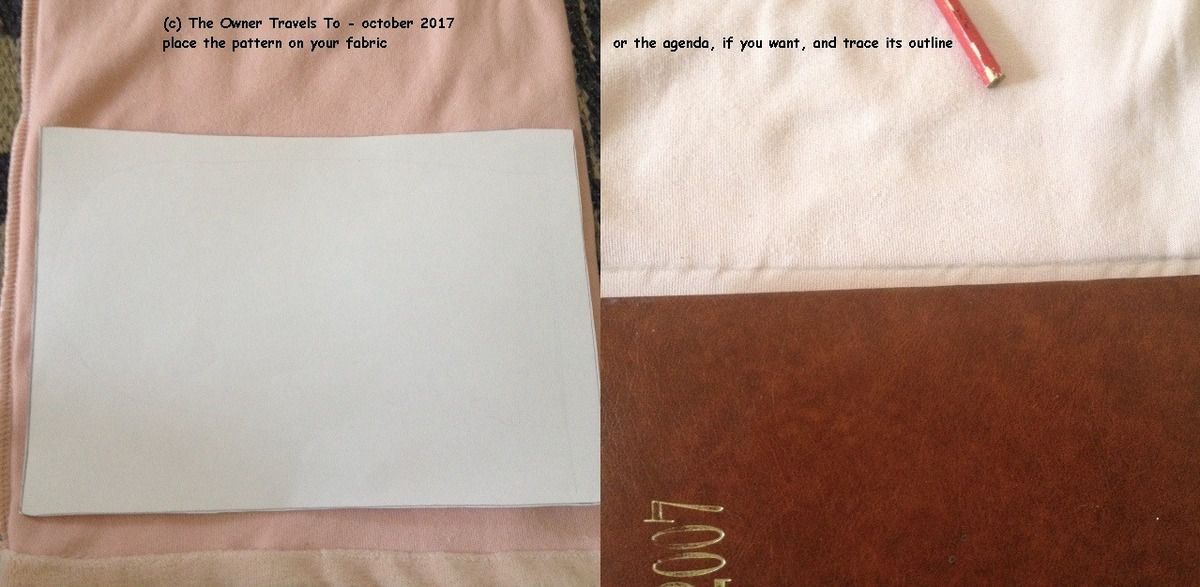
- take the pencil and paper, and draw your hand's outline, to make the pattern for the pocket. Leave some space around the hand because you don't want a very tight pocket. Use your smartphone as well, if you want to make sure it will fit into the future pocket.
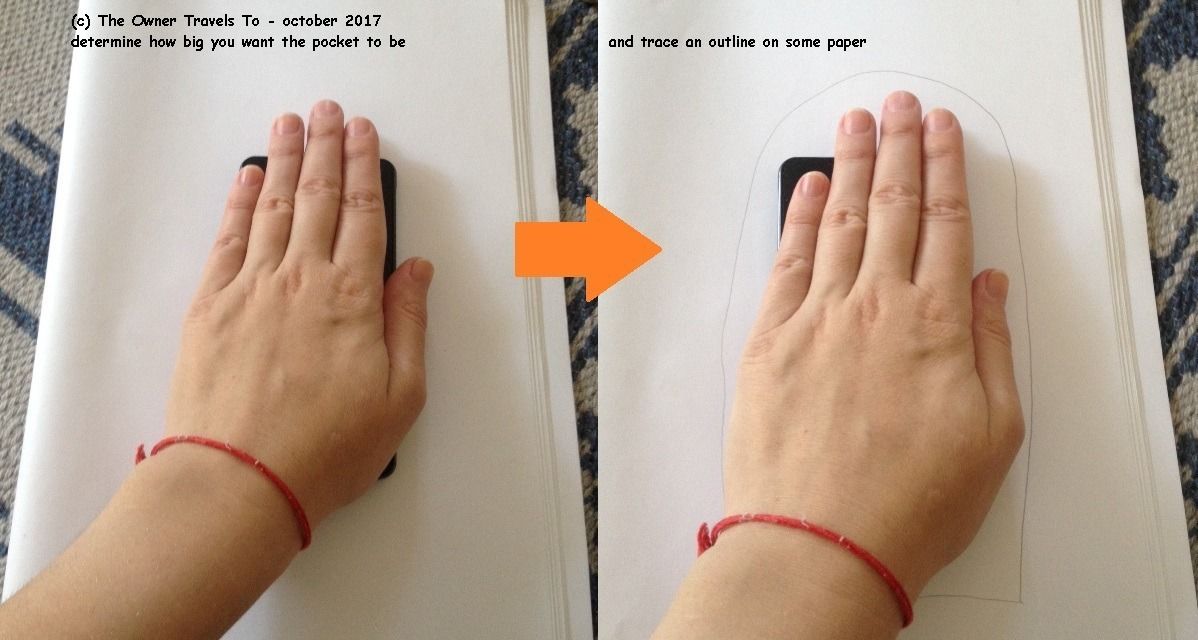
Remove your hand, and realize the pocket will be too small and possibly too ugly too for an outer patch pocket. Decide at this point to use a bigger item, like an A5 agenda or notebook, or any other item of that size. Trace its outline on the paper instead of your hand.
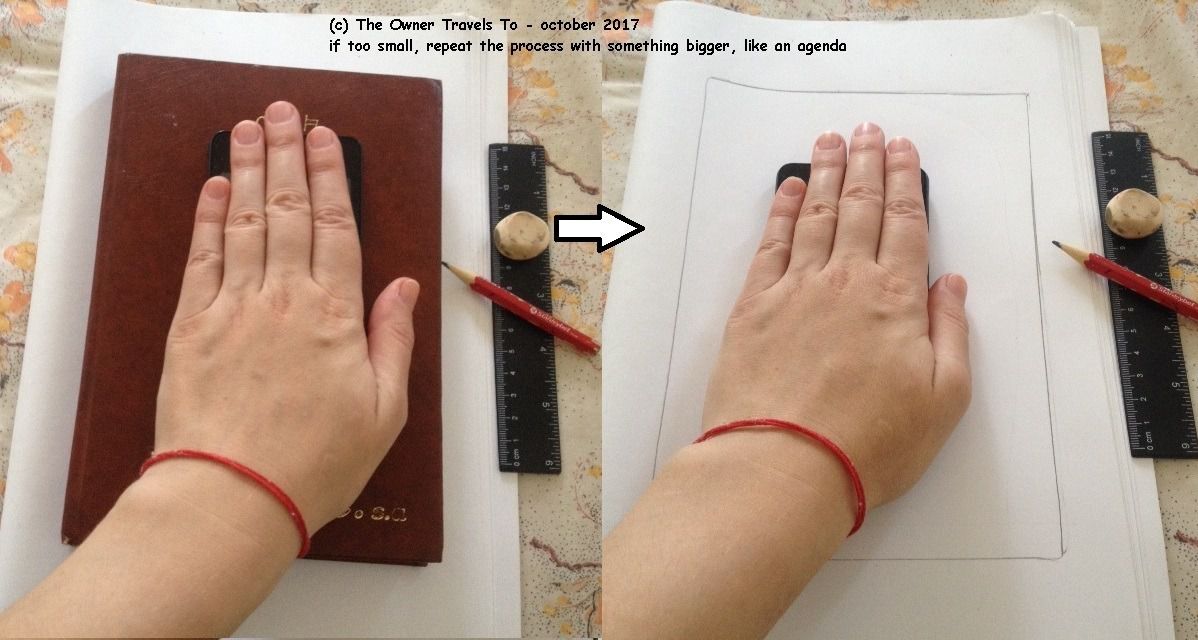
You can use a different paper, the back of the one you used already, or the same paper like me. You may choose to erase the first attempt, like I did, or not.
- Cut the paper pattern and use it to cut your fabric. While you could use the agenda or notebook to draw directly on the fabric, the paper is lighter, and you can attach it to said material to make sure it stays in place. This is especially helpful when you're not someone with more experience when it comes to sewing or making clothes.
Cutting the fabric should be easy enough if you laid the fabric completely flat. You just need to own good scissors for the purpose. Make sure to cut enough pieces for as many pockets you want to make. I cut 2 pieces but only used one. But I may use the other one in the [near] future.
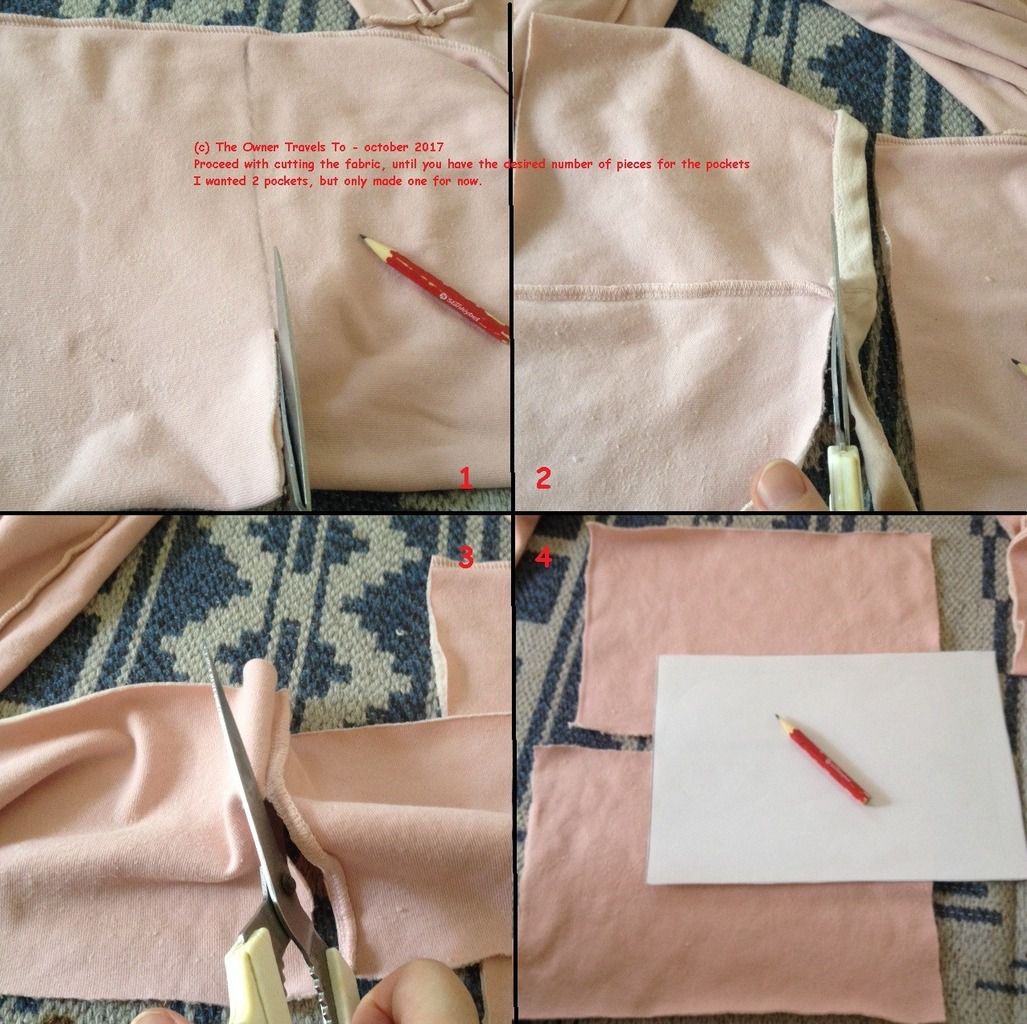
I had to cut away the seams of the pants, as I used the lower part. I also removed their hem as the fabric there was dirty and too thick. eww
- The next step is to find a position for your pocket, on the garment. I recommend putting the garment on and then deciding where the best place would be. I chose it while the pants were off of me, and I didn't realize it would be too low. I did want it to cover 2 small holes that appeared in my pants [eww, no craftsmanship in the HM labor camps/factories and the cheapest yarn possible.]
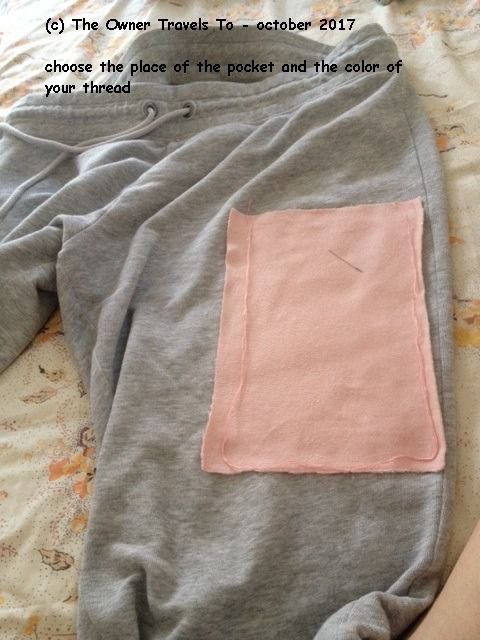
While you're here, make sure you choose matching yarn as well. I measured it too, since I was about to had sew this patch and I don't need unlimited supply.
- You're supposed to start sewing at this point. You are allowed to make some tea or coffee if you didn't have one before. Make sure to sew an upper hem as well - it will look more professional. You should also ensure to fold in in the edges of your pocket patch.
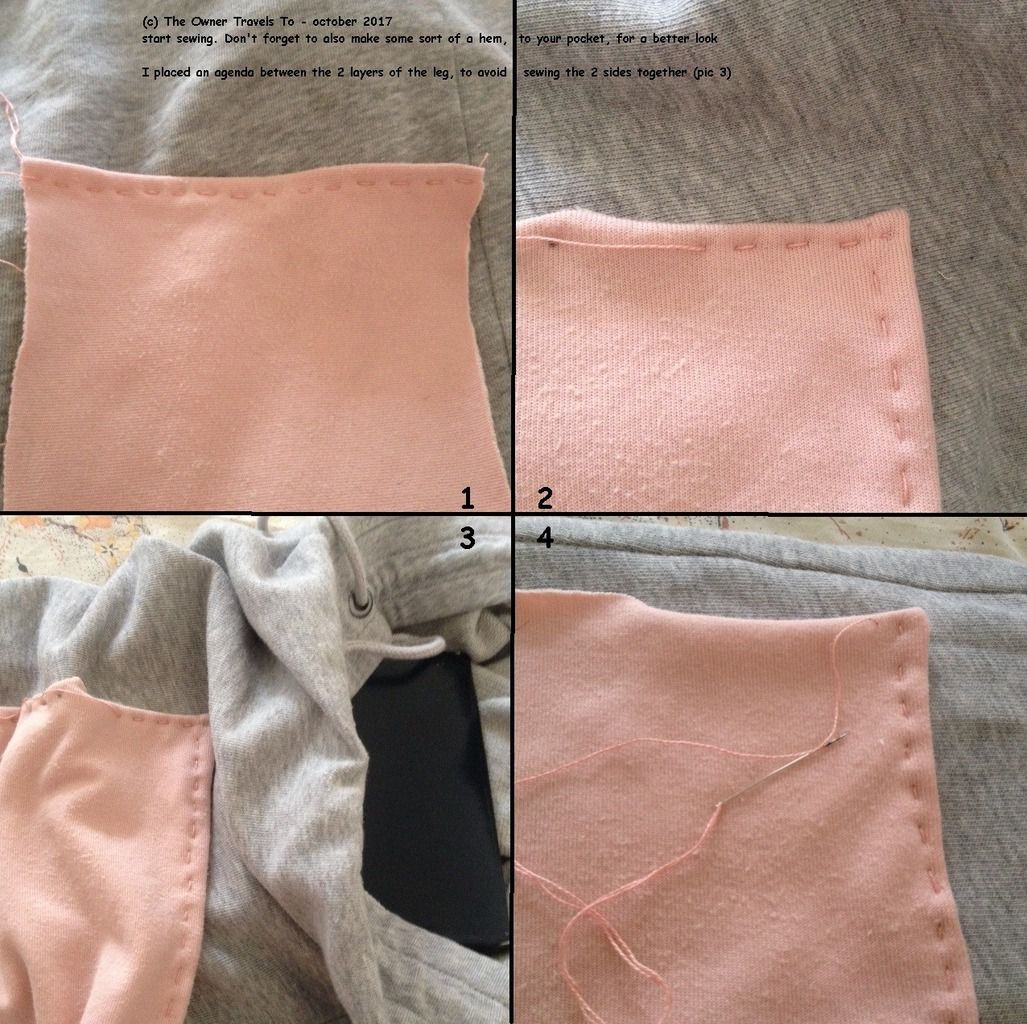
If you also chose pants or another garment that is pretty tight, or don't own a sewing machine [like me], you have to pay attention NOT to sew together the 2 sides of the item. You can avoid this accident by placing an agenda right under the working spot - like I did in the 3rd shot, in the image above.
In case you're wondering, I'm right handed, so I sew towards the left hand, but I placed the pictures in a left-to-right order ... I hope it doesn't confuse you.
- When you're finally done, more likely an hour or more later, your pocket should look like in the image below. I think I will go with another sewing session, to give it more strength - I don't trust it much with just one go done by hand.
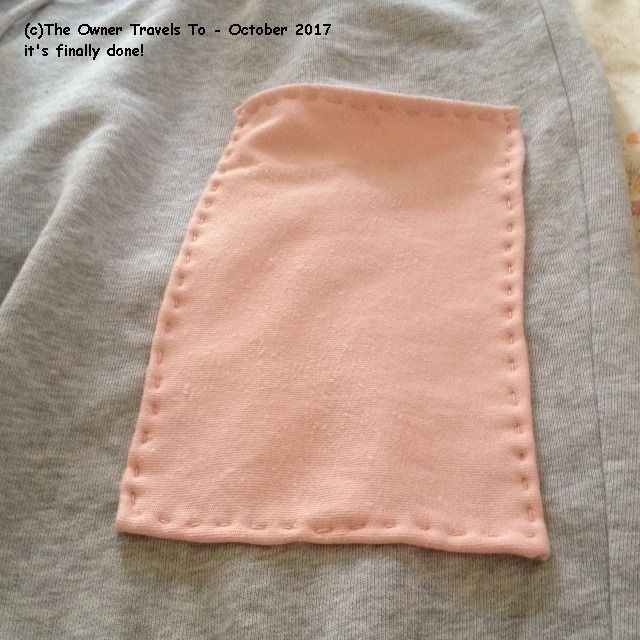
My partner said she likes it, and I think it's decent enough. I was lucky with the colors too as gray and pink look nice together. The pants are now more interesting, eye catching, and make my life easier when I don't want to carry a lot of stuff.


before and after
I hope you find this little DIY project useful. See you next time!
©Charly Cross 2013 – present. . All rights reserved. [previously known as The Owner Travels To]


/image%2F2671538%2F20180226%2Fob_f9c4d6_charly.png)