Overblog
Suivre ce blog Administration + Créer mon blog

sewing

Sewing a Skirt from a Vintage Burda

Publié le par Charly C.

Hello, all!

I don't know how many of you remember that last year I did something called Blog-March. There aren't many entries to check out, sadly. This year, I decided not to participate anymore.  

In this entry, i mentioned i made a green skirt, perfect for Saint Patrick's day, celebrated on March 17th. I believe I also mentioned i might share how I made it and so on. Well, today is the day this will happen. And as it happens, it is now May that i finally manage to gather my thoughts related to this entry and complete it.

green skirt slow fashion sewing diy clothes Burda Moden
Please ignore the wrinkles..

SKIRT DESIGN

I found the skirt in a vintage Burda magazine, from May 1996! I posted a quite short browse-through of this issue, in this entry, if you're curious. 

Below, you'll see what the skirt is supposed to look like, according to the magazine. The skirt has 2 front panels, 2 back panels, pockets, a waist band, as well as panels for the buttons and button holes. 

Skirt 107 from Burda Moden 5/1996
Skirt 107 from Burda Moden 5/1996Skirt 107 from Burda Moden 5/1996

Skirt 107 from Burda Moden 5/1996

As you can see, Burda is rating the difficulty of the designs it shares. I think the rating is from 1 to 4 or 5 dots. This skirt has a rating of 2 dots, making it relatively easy to make. For those confused, in the picture with the model sitting, 106 represents a body. The skirt has the number 107. 

The difficult part is the pockets. I believe there's a sewing lesson with how these pockets must be done. Let's just say i simplified my life by not using any pockets initially. I only added them last month, but i'll talk about that later. 

The sizes of the skirt are European 36 through 44, where 36 is a Small and 44 is a Medium? In Burda, 44 is the smallest size for the garments dedicated to "Plus Sizes." According to the measurements in Burda, i'm size 44 and so this is the one i traced and made. 

It seems i have no picture taken of the traced pattern, just this copy i made in order to make a patchwork skirt. This is what i'm currently working on. One of the projects. 

The skirt is supposed to be 80 cm long. I don't know why i remember adding a few more centimeters to this, but i'm not sure i did. 

Sewing skirt with vintage Burda 5/1996 pattern

FABRIC

As far as fabric goes, i had this green fabric i found at the dumpster. It was a neighbor who got rid of several lengths of various types of fabrics. The colors and overall design also differed. 

In the next pictures, i'll share, you'll see the color changing. This is because i was working in the evening, and my light was crap.

I believe the weave is a damask. I'm not sure what the fiber is. The burn test indicates cotton or similar, as it smells like burned paper. It is relatively heavy, so it hangs nicely. 

However, i didn't have quite enough fabric to make the skirt as it was indicated, or perhaps I wanted to make things a bit easier on me. I forgot. This means i cut the back part on the fold, giving me one less seam to sew. 

Cutting the panels and sewing them together was very easy, and nothing to write home about. The next step i took was to attach the panels for the buttons and their respective holes.

This was also pretty easy: I sewed pretty sides together, then i sewed by hand on the back (i think). This way, the raw edges were enclosed in the button bands. The next step i took, was to install the waistband. I redid the process, though i do regret not reinforcing in any way the waistband. 

Then i had to hem the skirt. i made some sort of maybe bias? tape out of an underskirt i somehow i also found at the dumpster. The original item had nearly the same shade of green as the skirt, as you can see in the next picture. 

Buttons and Closure

The skirt is supposed to have real buttons down the front, however due to my fancy-looking fabric, i didn't think this would be the best choice especially since the buttonholes had to be done in the fabric. My next option was to install a zipper, but i'm not that good in this department and i wasn't thrilled by this idea either. 

green skirt slow fashion golden buttons sewing with burda
testing out some golden buttons. i liked the look, but i didn't lik the buttons up-close

A brilliant idea came to me when i realized i can use snap buttons hidden by fabric-covered but fake buttons. I had some on an old silk jacket, so i undid one of those to see how they're made. I noticed that it had 2 layers of material, one the size of the button and the other one, larger. I then copied the fabric outline onto paper, to make patterns.

golden buttons damask silk close up
Closeup of the buttons i was considering and the one i copied

Once i had the patterns, i cut out the fabric, and i started covering my buttons. I luckily had some old, ugly, blue buttons that have the same size as the original.

The first step was to stitch a simple row around the edge of the fabric, put the smaller piece on top, then the button, and then pull the thread to close the fabric like a really small sack. The last steps would be to secure the fabric around the button with a few extra stitches and then to attach the new button to the skirt. 

Refer to the next pictures for a better mental image regarding this process, along with a comparison to the original button. 

Sewing a Skirt from a Vintage Burda

It would probably have been easier if, for the smaller pieces, i would have drawn circles directly with the button, but the idea just occured to me now (more than a year after i completed the process). 

For the snap closure, i had to go to the haberdashery to buy the snaps. Luckily, i found and they were affordable. They’re the same diameter as the buttons. I sewed the snaps first, then the fake buttons on top and I really like the result! The swish! factor is 'chef’s kiss' 😗

sewing Burda may 1996 green skirt handmade

In this picture above you can see the hem of the skirt on the inside. That green band used to be some petticoat maybe? but it couldn't be used anymore - i forgot why. So i cut strips of some 7 cm? (3 inches? about?) and i sewed them together, to form a VERY long ribbon.

I know for sure i didn't cut the fabric on the bias but on the grain line. Then, the very long ribbon i sewed by machine to the very (not even) edge of the skirt, and then i sewed it by hand to hide ALL raw fabric edges. The best part about doing this is that i was able to more or less even out the skirt's hem and the result is rather professional looking - if you ask me.   

This year (2022) I decided I wanted pockets in this skirt even if the fabric is fancy-looking. Look, pockets are useful even in a fancy-looking garment, ok? for this, I had to take the easiest route, and that was to open the seams of the skirt. Look it up all you want: seam pockets are the easiest to make, even in already bought garments. 

However, this is will require an entry of its own. This one already became too long. What i want to say is that i really like the result and i think it looks BETTER than in the Burda sewing magazine. 

©Charly Cross 2013 - present. All rights reserved.

Do you want to buy me a coffee? this is a 1-time donation, thank you very much!

Voir les commentaires

Browsing Burda May 1996

Publié le par Charly C.

Hello all! 

This is a pretty short entry as I want to present to you all, the Burda magazine for May 1996! 

I made a video browse-through of still pics with transitions and some notes, and even though it doesn't sound as interesting as it should, it did require some work on my part. 

I think it took me some 2 hours to put it together, without the taking pictures part.

Why is this issue important? No particular reason, This is currently the oldest Burda issue I own and I already made a pair of pants twice, in 2 different sizes. You can read more about the process here.

If you're wondering why i didn't post this entry on my Being Obscure reviews site/blog, is because I don't review the magazine. i just make a browse through. 

There's barely any commentary and all of it is written as captions. I think it fits more here. 

I hope you like the issue, and it's just in time for the month of May of this year. 

I have another browse through to prepare for June, but the year is 2013. Stay tuned for that! 

That's not the next issue I own, chronologically, but the one that fits with the time of the year. I hope you're OK with my choice.  

© Charly Cross 2013 - present. All rights reserved.

Voir les commentaires

Making Victorian-inspired pantaloons - Sewing with a vintage Burda

Publié le par Charly C.

Hello.

In November I had some time to make something and to even finish it. YAY!

Disclaimer: Well, I'm not sure they're really called "pantaloons" but this is what I'll call them in this article. I say they're Victorian-inspired because they have frills and lace. 

INSPIRATION

My inspiration came from 2 places if I can call them that. 

The first place is Subeta's (that is a referral link to this online pet and dress-up game) Magical Pirate Pantaloons of Sweet Love - you can see them here (This is a fan-made and helpful site for those playing Subeta).

The above image belongs to Subeta - used for informational purposes.

The second place is Bernadette Banner's video in which she makes a pair of Victorian underwear or combinations. You can watch the video here. She uses historically accurate fabrics and methods, including or especially hand-sewing. 

The end result is closer to the Pantaloons of Sweet Love mentioned above, as you'll see from the pictures. 

WHAT DID I USE

Fabric: As for fabric, I used some blue and very thin polyester fabric I had. Despite it being polyester, it feels quite nice against the skin. 

Pattern: For the pattern, I had nothing "historical" or something made for a (Halloween) costume. I had this May 1996 Burda magazine that had a pattern I could use. 

I needed some loose trousers with the simplest pattern possible. This one had just 2 pieces and was very loose. What else can I ask for?!

Other supplies: a pair of shears, matching thread, sewing machine, some elastic (not included in the picture), hand-made lace, and chord that i just had on hand. The lace and chord were either given to me or i may have found them at the trash

The white lace is the remaining piece from what i had. Because it didn't occur to me to take pictures BEFORE i use it. Click here to see a close-up of the lace and the chord thing. 

WHAT DID I DO

As you could imagine, first I had to trace out my pattern pieces and to cut the fabric. As a matter of fact, i wanted to make these Burda trousers for Anna, a while back. So i had the pattern already traced out and cut. 

I only needed to cut the fabric. I folded the fabric in half, placed the paper on it, and cut with no seam allowance. This design is quite loose, therefore cutting with no seam allowance is fine. Otherwise, Burda patterns require you to add 1 cm (about half an inch?) of the seam allowance. 

The next step was to sew 1 front piece to a back piece, then to sew the crotch. And at this point, you have a pair of trousers. I made a channel for the elastic at the waist, out of the pants - the design has a quite long crotch area, and therefore, you have plenty of fabric to just roll the top inwards twice for this purpose.  

As you can see, my seam allowance is pretty small, but enough.

You can use elastic or a chord. This depends on whether you just want to pull the pants on or you want to bother to knot the chord, as the line drawing suggests. For me, the elastic was just SO easy! 

And now comes the part where i made my first mistake which made things a bit more difficult for me. I constructed the trousers BEFORE i added the lace or formed those ruffles or channel for the knee elastic.  

If you ever sew something, you would know it's easier to put ruffles on something when the item is flat/2D and not in a 3D shape. I think i would have been more accurate as well. 

My next steps were as follows:

I measured about the place where i want the elastic to be, made the channel for it, eyeballed the place of the first ruffle, eyeballed the location of the hem, and completed the first leg. 

I assumed that finishing 1 leg and then doing the second one would be easier. I'm not sure if it was or not, but it did feel that way.  

Another mistake was not to measure the white lace, to ensure i have enough. From my eyeballing, it looked as if i did have enough. By now, you already know my guess was correct.

However, while I was working on the project, i had my doubts when time came for me to complete the second leg. I suggest you measure everything ahead of time, unless you trust your eyeballing guess. I'm pretty good at guessing, and this is why i didn't do the sensible thing of measuring. But I shall in the future. 

Once the ruffles and the lace were installed, the pantaloons were done! YAY! Now (as I type this), they're packed and hidden, as they're a gift for Anna. You'll be reading this after she gets her present, sorry. 


Previous Experience

What i want to also mention is that i actually worked with this pattern once before. 

I made a pair of trousers for myself, last year in October. Back then, i used this pinkish silk fabric, that only later i realized it could be silk and i nearly fainted. I was either brave or decided to just go for it, and make myself some trousers. 

That being said, this is how my pair turned out. There are many mistakes to be seen up-close. From further away, you can't tell. 

For Anna, I used size 36 -the smallest available and for myself size 44, the largest available. I chose the sizes based on our measurements, but i didn't measure the pattern pieces themselves to see how large the finished garment would be. 

For my pair, i tried leaving 1 cm of the seam allowance. My pair is a bit too roomy. It's because of this previous experience with the pattern that i knew not to cut with a seam allowance this time around. 

As you can see, the expectation VS reality hits again, hahaha. Don't ask about what i'm wearing - at the time i thought it looked OK. The top is also hand/home-made, but it's a hand-me-down, so i don't know the pattern nor fabric. 

Yes, sadly, the picture with me is not complete, therefore you can't see these pants are a tiny bit short on me. But this is because I'm taller than most and the pattern is for regular-height persons. 

© Charly Cross 2013 - present. All rights reserved.

Voir les commentaires

Blogmas days 19 through 22

Publié le par Charly C.

Hello Everyone!

This entry is a short overview of Blogmas days 19, 20, 21, and 22. The challenges for days 23 and 24 have never been posted. Even the challenges for these 4 days appeared much later. 

With all these aspects taken into account, this will be the last blogmas entry for me, for this year. 

I'm writing this on the 27th, but thanks to some functionalities, I can post this on any previous day I want (as I type this, I'm still trying to decide on which day to post this). Someone who will read this blog for the first time in the future, will not know without this disclosure. 

I just wanted to mention this, so that those of you who visit my blog will not think your brain is playing tricks on you. 

On with the challenges, shall we?

DAYS 19 and 20

I put together these 2 days because they have the same challenge: finish up the gifts for Christmas

I gifted my partner mostly on Hanukkah and on the virtual-pet site we play. You can read more and see here the gift I prepared for them. 

I still prepared another gift for them. This time a satin poncho/wrap/thing that looks as if it could be some pajama top or cover. 

It can be worn anywhere, any time almost. I want to write a blog entry about how I made it and everything, so please keep an eye out for that. I want to post it before the New Year, but we'll see. 

DAY 21

The challenge for the 21st day of blogmas was to draw a line/conclusion from the statistics (of the blog). 

So, i posted  during 10 months out of 12 in 2020. However, i had people visiting my blog every month. I'll share the data here for transparency, as well as for me to find it easier if i ever want to look back on it (in December 2021 for instance). 

statistics
MONTH #posts VISITS VIEWS
january 3 86 111
february 3 43 49
march - 102 143
april 3 219 252
may 2 111 130
june - 81 100
july 2 80 106
august 2 95 127
september 1 125 171
october 2 218 288
november 2 127 167
december 16 174 213
TOTAL 36 1461 1857

The article with most views is "What is tea like in Romania." I posted a total of 36 articles in 2020, this one not included. 

The only thing i can think of that drove more visits was that i was probably more active on various forums where i have links to my blog/site in the signature. 

DAY 22

For the 22nd day of the blogmas, all we had to do was to enter a contest for a free business account for 1 year! And of course i entered. 

and....

I WON! I WON! I WON! 

I can't believe i won! 

The cost of the Business account is 239.88 euro per year. I had an Individual (lower) account that costs 59.88 euro per year. Those who choose to pay every month, have to pay 23.99 euro/month (or 287.88 euro per year) and 5.99 euro/month (or 71.88 euro per year), respectively.

Now I have to post as much as i humanly can, to take advantage of this offer. 

See you next year!

© Charly Cross 2013 - present. All rights reserved.

Voir les commentaires

Changing a jacket' sleeves

Publié le par Charly C.

Hello all! 

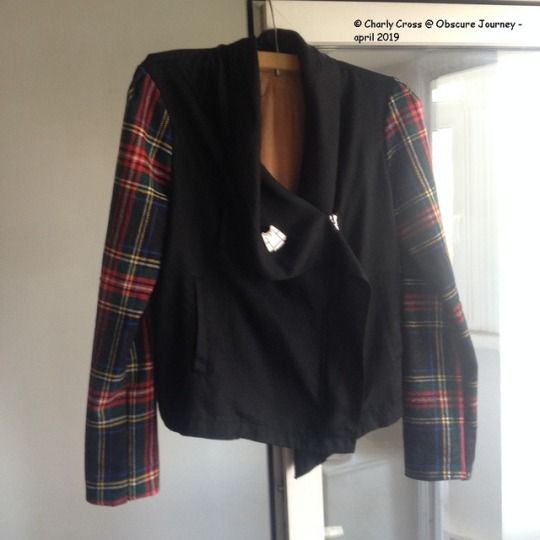
I had a thin Zara jacket with faux leather sleeves. I bought it several years back during the summer sales, if I'm not mistaken. But as it goes, faux leather started peeling and I don't like that. I don't know who likes peeling leatherette, to be honest.  So, I thought to myself that I won't be wearing the jacket anymore though I could try to change its sleeves now that I have some good fabric shears and a decent sewing machine. I also have a few books that teach how to make sleeves and attach them to the garment. The only downside was that I would be ruining the pretty (and very cheap) fabric A got me (from a second hand store. It was there because someone cut it twice on bias, and it probably wasn't enough for their project.) 

So, my thoughts were:

  • I wanted to make something with the fabric
  • I HAD to use it (the fabric) in the end, somehow
  • the fabric was cheap - about $1 for a yard or so? I didn't measure it, sadly. 
  • I wasn't going to wear the jacket anymore
  • I would be learning something
  • I received encouragement to "just go for it!"

I don't think I needed more excuses. So I started with ripping the seams apart because I wanted to use the existing sleeve as pattern for the new sleeve. 

  • the sizing was the right one, especially the arm-hole
  • the length was ok - i could always cut a few extra cm if needed, which I did anyway.
  • I wasn't in the mood to learn how to make a sleeve pattern from scratch. That day will come, but it wasn't this day. 

Sadly, I don't have pictures for all the steps :( I thought of taking pictures when it was too late. Some steps don't even need pictures because anyone can do those with the right tool.

the process

I started by removing the sleeves from the body of the jacket using the seam ripper. My sleeves also had zippers, so I also removed those after. 

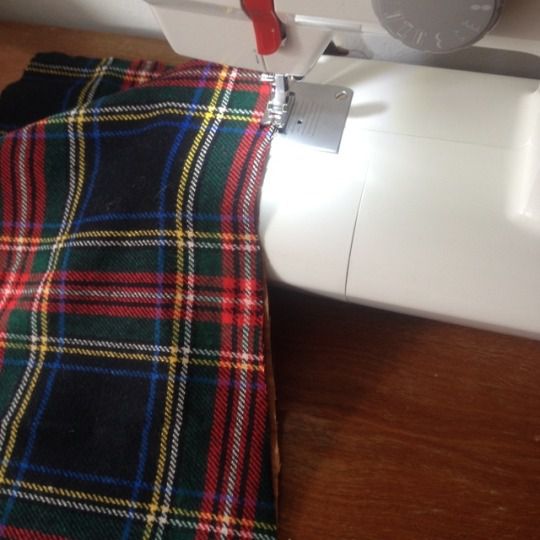
Once I had my sleeves, I took one and I placed it flat on some newspaper to make a sleeve pattern, so I can cut the new sleeve from some fabric. I placed the fabric folded over.  When I cut the fabric, I included more seam allowance vertically, but not for the width. 

I didn' like what the fabric felt against the skin, as I knew I would wear this jacket over a tshirt as well. This meant I had to find some fabric to make a lining. The fabric I found is brown and ugly, but serves the purpose just fine. 

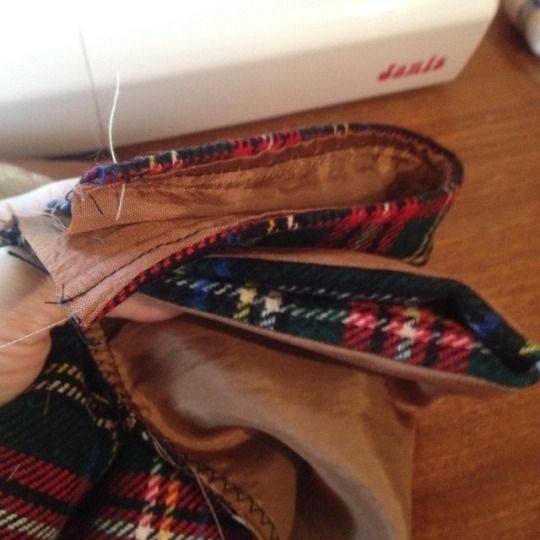
You can't really tell from the picture, but first I sew the sleeve to the lining (former sleep wear i believe) at the wrist-end. I then pinned down the sleeve to the rest of the fabric, and then I cut the lining. (note 1)

I also sew the lining to the tartan, before assembling the sleeve together. I figured that shiny and slippery fabric would be difficult to work with if it's not attached. I also ran a zig-zag stitch. (note 2)

Originally, the previous sleeves did have lining as well. I couldn't use it though. The seam allowance was fraying badly. Additionally it was shorter, because the leatherette was folded over some, like the sleeves on suits and coats. 

As I said, I wasn't going to learn how to make such sleeves. This means that the brown lining can be seen at the wrist level, on my sleeves. It also looked ugly. I decided to run a top stitch to see if it looks any better, and it did! See the picture below.

If you do a sleeve like I did here, I highly recommend you do the same. In my opinion, the piece looks 'done more professionally.' You can do this top stitch AFTER sewing the sleeve, so that  the seams would lay flat against your wrist, and rub less. If I ever do this again, I'll know what I need to improve :)

 After my sleeves were complete, it was time I attached them to the body of the jacket. The sleeves I made were a bit larger than the arm holes of the jacket. I started pinning the sleeves starting at the armpit seams going to the top. At the shoulder part, I needed to create 2 pleats. Gathering the fabric is an option, but not for this lined tartan. The pleats give the sleeves a more structured, put-together, "professionally done" look, in my opinion.

And this is the final result! What do you think? 

extra step

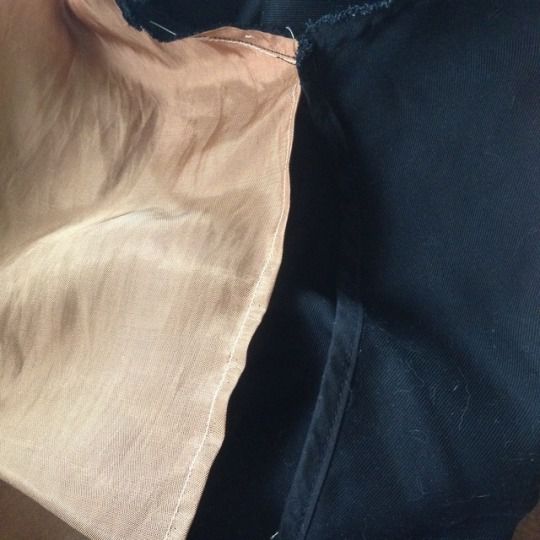
However, before attaching the sleeves, I decided I wanted some lining for the back part of the jacket as well. I used the same ugly brown one as for the sleeves. The jacket is very thin, and the spring was cold this year. I wanted some protection from the wind, and the lining would provide just that. 

I used the back of the jacket to serve as guide for a pattern, drew it on paper, cut the brown fabric, and sew it onto the seams of the jacket. I don't have more pictures, sorry. :( 

 That's about it! Don't skip reading the notes below to learn what I wish I did differently.

See you soon! 

Note 1: The funny thing is that while I tried to sew the right side of the tartan fabric to the lining, i only managed with one sleeve. The other one, the tartan is on the wrong-side. I obviously saw too late. I didn't and won't go back to fix it. 

Note 2: I wish I assembled the tartan first into a sleeve, then the lining, and then attach the tartan to the lining at the wrist. I thought of this too late. 

Note 3: This project is from April 2019. I didn't get to watermark the images. Now with my arm in a cast, doing so is more difficult. 

© Charly Cross 2013 - present. All rights reserved.

Voir les commentaires

Romanian style embroidery

Publié le par Charly C.

Hello everyone!

Today I want to share with you my newest interest - cross-stitching. WooHoo! /throws confetti/ oh, i'll clean that ... later...


freestyle vs patternfreestyle vs pattern

freestyle vs pattern

Cross stitching is something I didn't think i'd get into. But somehow it happened. The story is a bit longer than this. Back in 2015 I received this gigantic sheet for the inter blanket -duvet? I thought I can't possibly use it as it is, and i thought I could turn it into pillow cases. And therefore I started measuring, cutting and sewing -everything by hand. 

If you don't have a lot of resources, and you need to hem your cloth, you can use some hair pins to keep the fabric in place. I found this method easy to use and not to ruin the material. On top of this, you can simply slide the pin as you need to advance. 

As a curiosity, i used a running stitch on the fabric i folded twice, and the stitch didn't get ruined in the laundry machine. 

my pictures, from my instagram @secret.agent0101my pictures, from my instagram @secret.agent0101

my pictures, from my instagram @secret.agent0101

I wanted to use traditional motifs, so i asked people i knew if they had something to help out. I needed both patterns and thread. Of course they did and they gave me a book with traditional patterns and a lot of thread as well. 

Romanian style embroideryRomanian style embroideryRomanian style embroidery

I flipped through the book to find a design that wasn't too complicated to replicate since I'm a beginner. And i found some that did looked easy, in a single color.

The one i decided on was all black and seemed easy enough. I copied it on paper using colored pencils, because i wanted some more colors on my pillow. 

The next step was to make sure the colors looked ok together. They weren't bad and they look better in real life.

i changed the design a bit more [3rd picture above]i changed the design a bit more [3rd picture above]i changed the design a bit more [3rd picture above]

i changed the design a bit more [3rd picture above]

The design i chose is the one in the lower right corner, in the book. I also show you how you're supposed to embroider it, if you like it. It makes a really nice edge on stuff, if positioned right.

I thought that an all black design would look too rough, though it would have been easier to stitch.

Did you know that Romanians traditionally sew with red and black thread, on white cloth? White means purity, red means joy and black means life.

I wanted to have at least 1 traditional color in my traditional motif. And this is why i choose red.

Romanian style embroideryRomanian style embroideryRomanian style embroidery

Since the cloth i decided to sew on in not easy to count the threads, i needed more visual help. I used a fountain pen. If you want to use the same method, make sure it's blue ink: red and black are staining the fabric and are more difficult to remove.

Of course, i sometimes messed up the guide. But it's ok as some of the errors got covered by some of the later stitches. 

None of these patterns have instructions on how or where to start from, so I had to figure these aspects myself. I figured that stitching the wave first would be easier later when i decide to add the other elements in other colors. 

However, drawing the guide [here the dots], then crossing the location of each stitch made my work even more easy. This allowed me to embroider whatever element I wanted first. 

Refer to the 1st picture in the beginning and the 3rd picture above, if you want to see what happens when you don't count the thread of your fabric, when you're supposed to do so.

Romanian style embroideryRomanian style embroidery

And above you can see the end result. I decided to embroider a hen eating grass as well. For that design i decided to use a piece of etamin fabric to trace a counted guide. it made my life quite easy, but for the size, i needed thinner thread. 

I like what everything looks like. I will continue practicing my embroidering skills though.

© Charly Cross 2013 - present. All rights reserved.

Voir les commentaires

Hacking my pants with a DIY pocket

Publié le par Charly Cross

While I have many other things to update you guys on, on Friday that just passed I was hit with a wave on inspiration and I thought I could write about the result, and show you the process of getting a similar look, if you'd like to.

Let's start with 2 things:

  1. pockets are useful and sometimes fun
  2. I have at least one clothing item with no pockets

Clearly, something had to be done, especially now that winter is coming. So I decided to hack my clothes by adding pockets to them. I started with some training pants - is this what they're called? - though, this must be one of the more difficult clothing items to start practicing with.

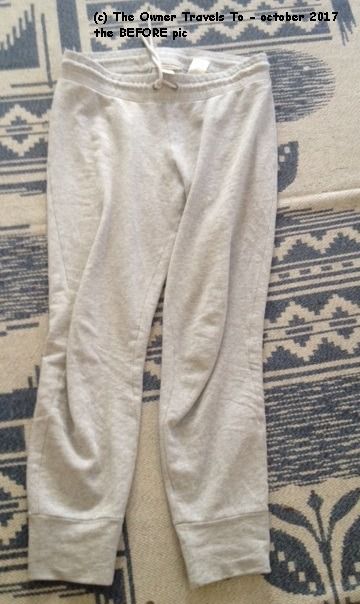
So these are my pants. Aren't they kinda plain and boring?

So these are my pants. Aren't they kinda plain and boring?

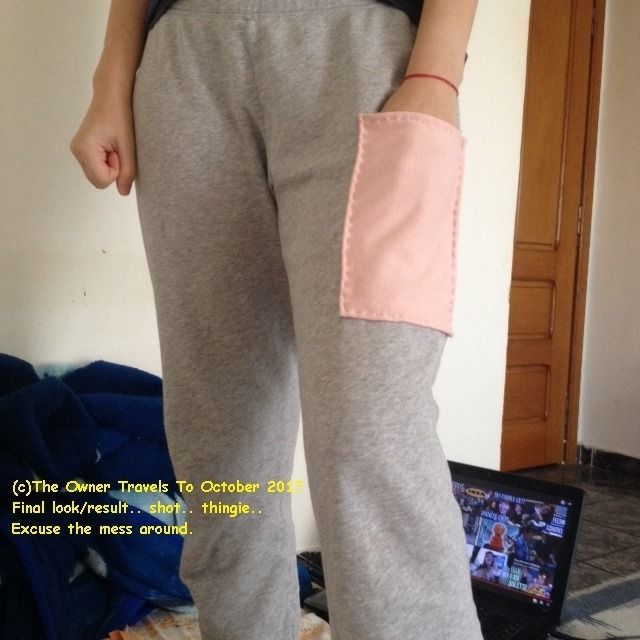
This is how they turned out!

This is how they turned out!

Not too shabby, if I can say so myself. My partner thinks the result is rather cute and not all that bad for the first ever DIY / hack project. There are a few steps to follow if you want a similar ... look, or result ... however you want to call it.

TOOLS:

  • clothes that need pockets
  • fabric to turn into pockets
  • scissors
  • thread and needle
  • pencil and eraser, maybe
  • paper [for your pattern]

HOW'S DONE, step by step: guaranteed 100% NOT foolproof

  • Choose a clothing item that could need some pockets - in my case, some HM sweat pants I got on sale, in summer or so.
  • Search for fabric that would look nice on the chosen clothing item. I used some old sweat pants by Juicy Couture, on baby pink [is this how the color is called?] Those pants were some 8 or 9 years old and were well loved and falling apart, but I still felt bad for just throwing them away and some parts were still in decent condition. hmmm
  • Make sure the fabric you find matches somewhat in thickness with the garment, and is made the same: woven or knitted. It will look better, than mixing thickness and fabric type.

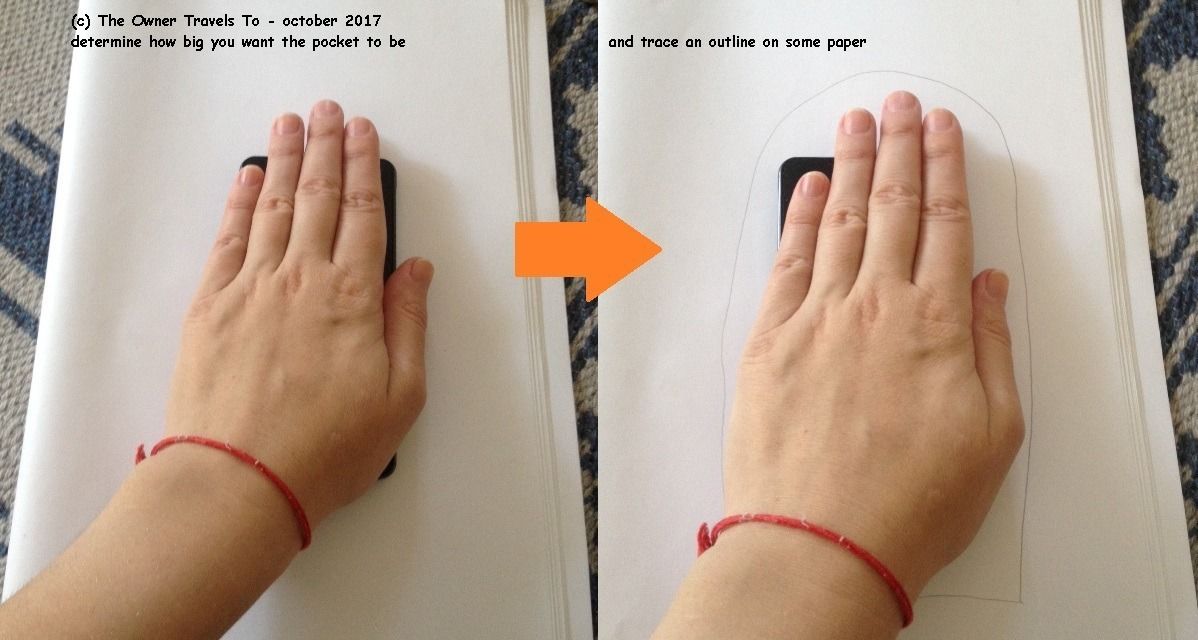
  • take the pencil and paper, and draw your hand's outline, to make the pattern for the pocket. Leave some space around the hand because you don't want a very tight pocket. Use your smartphone as well, if you want to make sure it will fit into the future pocket.
Hacking my pants with a DIY pocket

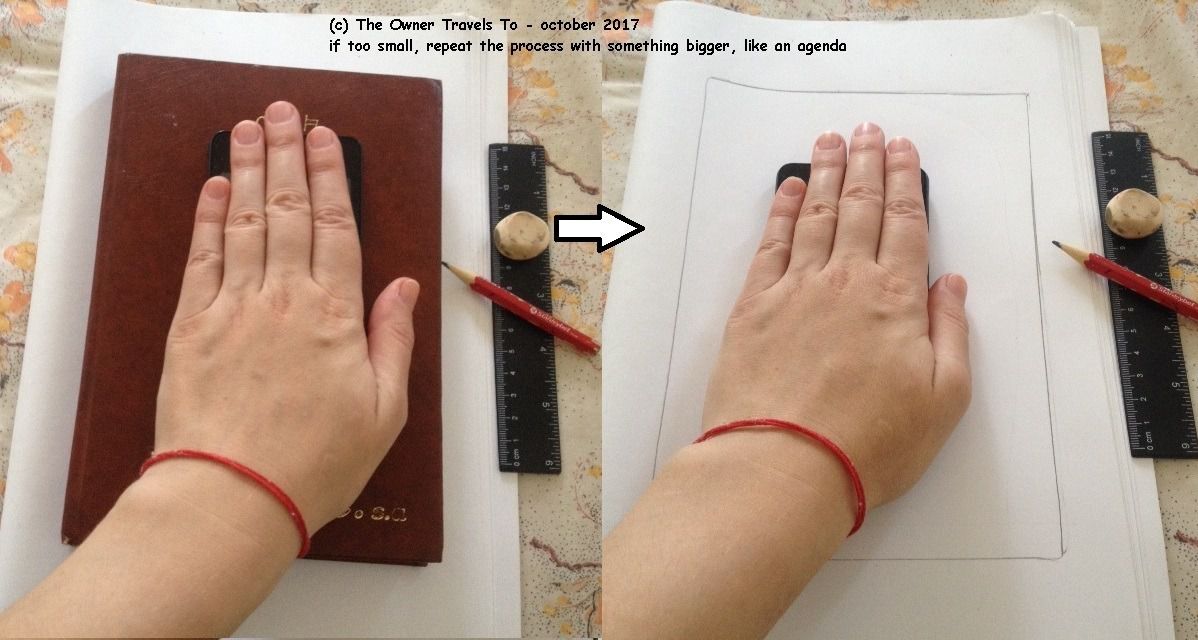
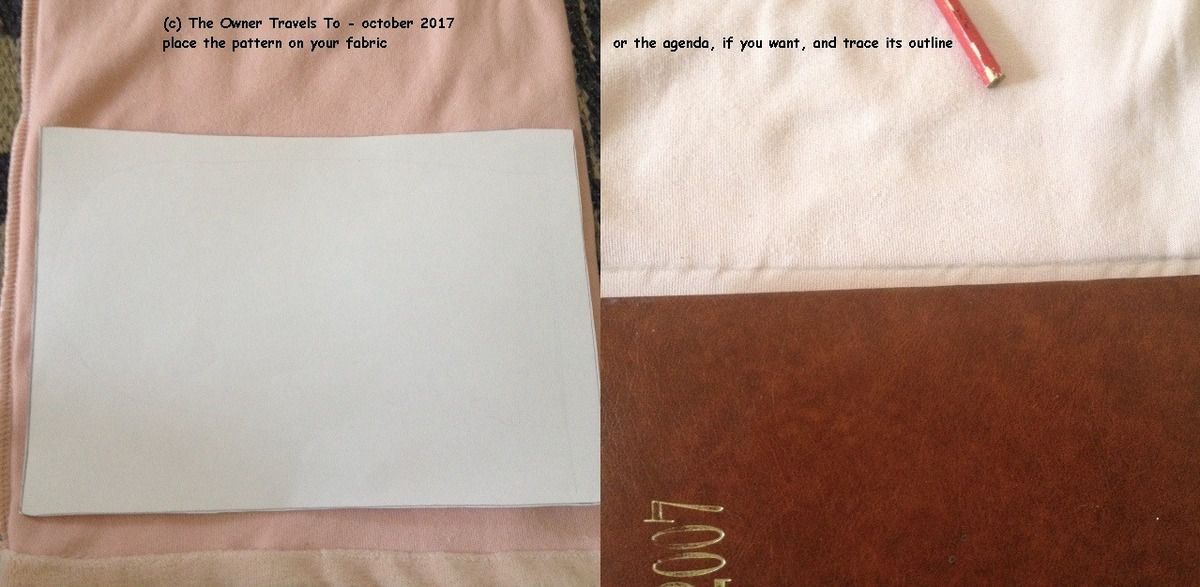
Remove your hand, and realize the pocket will be too small and possibly too ugly too for an outer patch pocket. Decide at this point to use a bigger item, like an A5 agenda or notebook, or any other item of that size. Trace its outline on the paper instead of your hand.

Hacking my pants with a DIY pocket

You can use a different paper, the back of the one you used already, or the same paper like me. You may choose to erase the first attempt, like I did, or not.

  • Cut the paper pattern and use it to cut your fabric. While you could use the agenda or notebook to draw directly on the fabric, the paper is lighter, and you can attach it to said material to make sure it stays in place. This is especially helpful when you're not someone with more experience when it comes to sewing or making clothes.
Hacking my pants with a DIY pocket

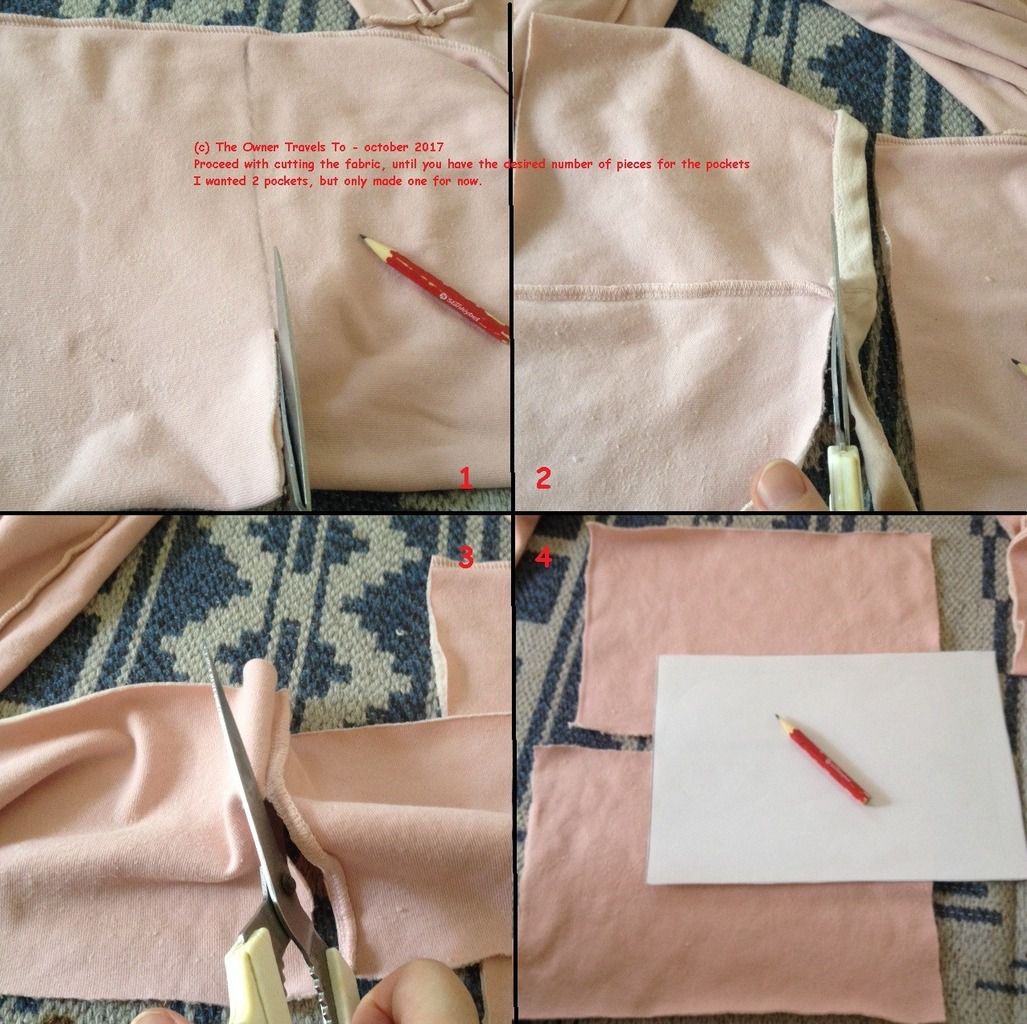
Cutting the fabric should be easy enough if you laid the fabric completely flat. You just need to own good scissors for the purpose. Make sure to cut enough pieces for as many pockets you want to make. I cut 2 pieces but only used one.  But I may use the other one in the [near] future.

Hacking my pants with a DIY pocket

I had to cut away the seams of the pants, as I used the lower part. I also removed their hem as the fabric there was dirty and too thick. eww

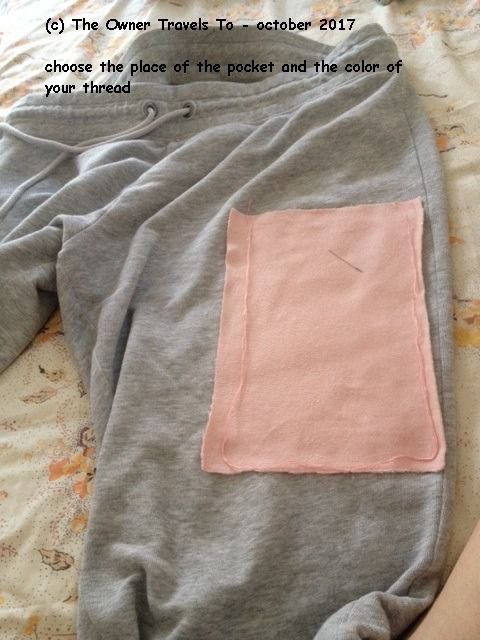
  • The next step is to find a position for your pocket, on the garment. I recommend putting the garment on and then deciding where the best place would be. I chose it while the pants were off of me, and I didn't realize it would be too low. I did want it to cover 2 small holes that appeared in my pants [eww, no craftsmanship in the HM labor camps/factories and the cheapest yarn possible.]
Hacking my pants with a DIY pocket

While you're here, make sure you choose matching yarn as well. I measured it too, since I was about to had sew this patch and I don't need unlimited supply.

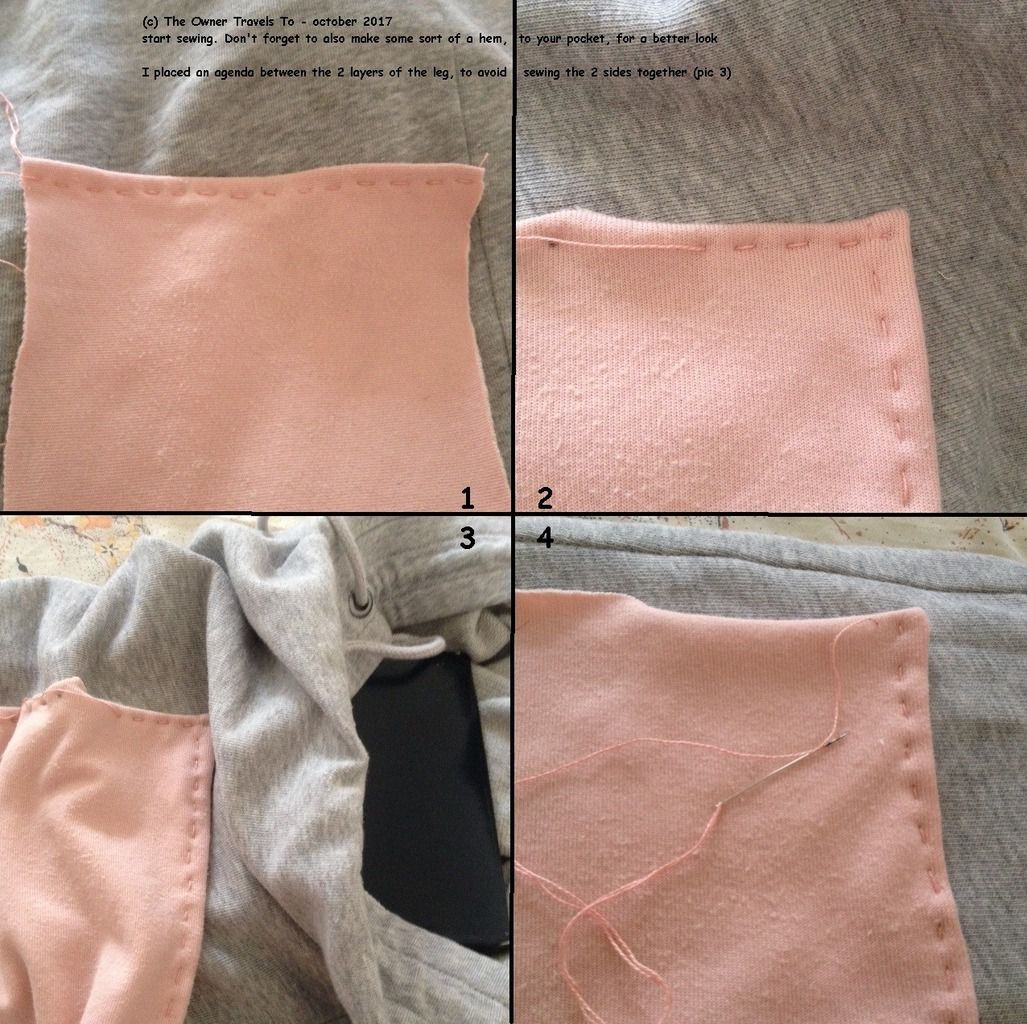
  • You're supposed to start sewing at this point. You are allowed to make some tea or coffee if you didn't have one before. Make sure to sew an upper hem as well - it will look more professional. You should also ensure to fold in in the edges of your pocket patch.
Hacking my pants with a DIY pocket

If you also chose pants or another garment that is pretty tight, or don't own a sewing machine [like me], you have to pay attention NOT to sew together the 2 sides of the item. You can avoid this accident by placing an agenda right under the working spot - like I did in the 3rd shot, in the image above.

In case you're wondering, I'm right handed, so I sew towards the left hand, but I placed the pictures in a left-to-right order ... I hope it doesn't confuse you.

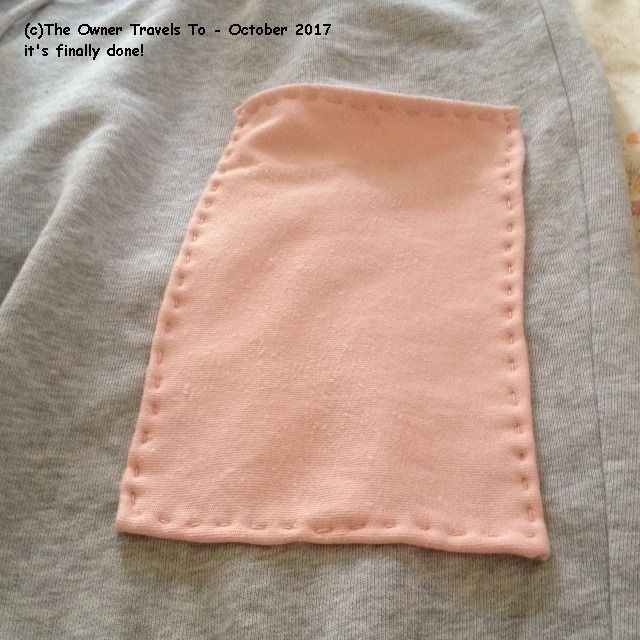
  • When you're finally done, more likely an hour or more later, your pocket should look like in the image below. I think I will go with another sewing session, to give it more strength - I don't trust it much with just one go done by hand.
Hacking my pants with a DIY pocket

My partner said she likes it, and I think it's decent enough. I was lucky with the colors too as gray and pink look nice together. The pants are now more interesting, eye catching, and make my life easier when I don't want to carry a lot of stuff.

before and afterbefore and after

before and after

            I hope you find this little DIY project useful. See you next time!


            ©Charly Cross 2013 – present. . All rights reserved. [previously known as The Owner Travels To]

            Voir les commentaires